Add an LDAP Server to ARM
Multiple Active Directories (ADs) can be added to the ARM database using LDAP protocol, useful for consolidating information in the enterprise. All the different lists of users in the enterprise, for example, can be consolidated into one LDAP directory that can be queried by any LDAP-enabled application requiring the information.
| ➢ | To add an LDAP server: |
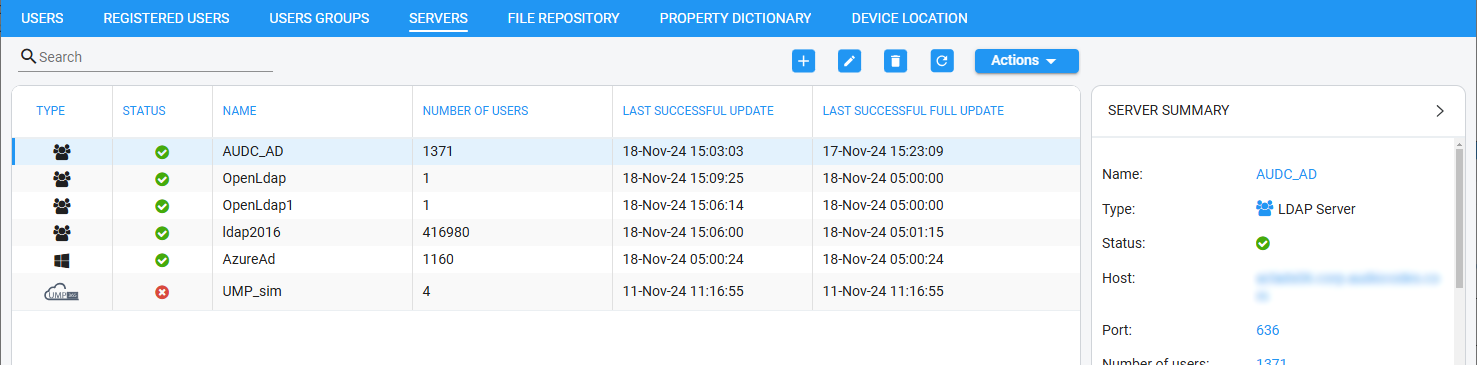
| 1. | Open the Servers page (Users > Servers). |
| 2. | Click the add + icon, and then from the drop-down menu, select LDAP server. |
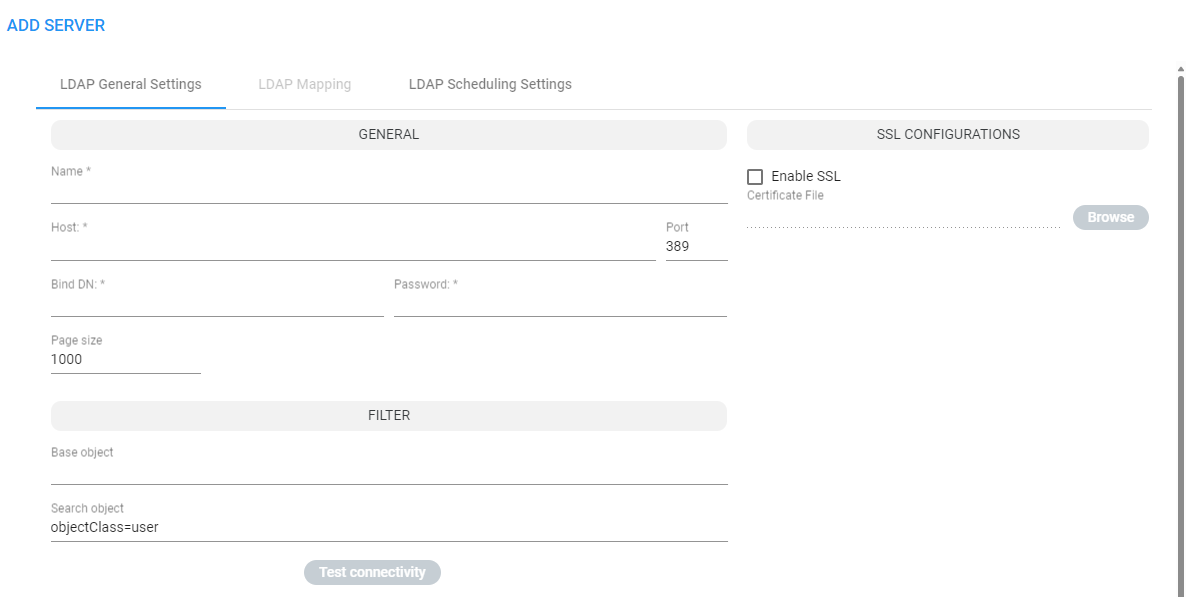
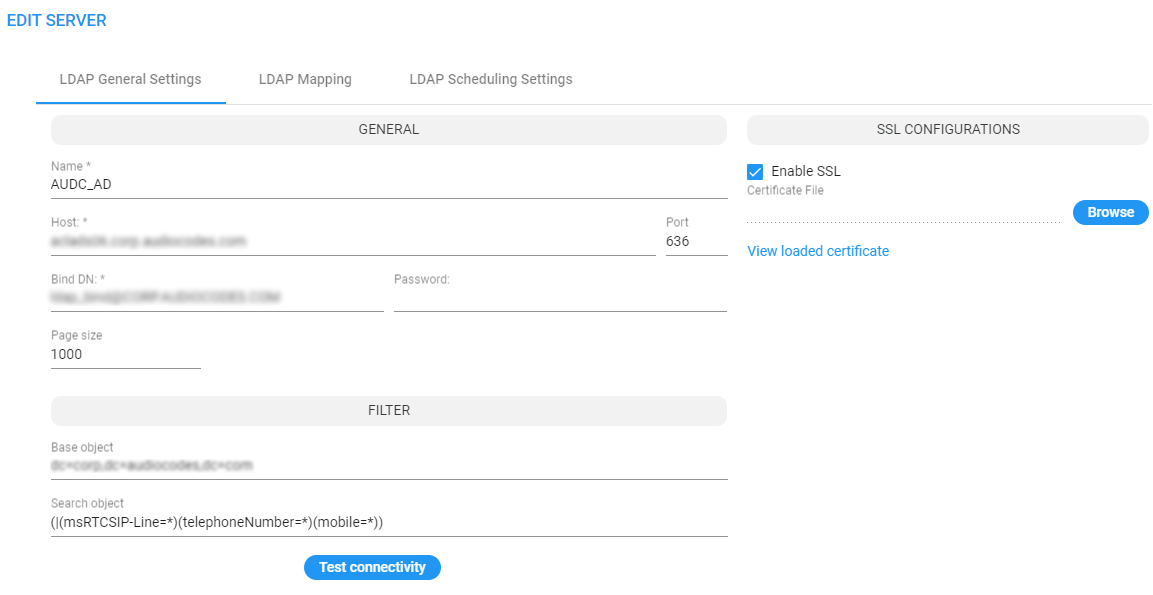
| 3. | Configure the LDAP General Settings using this table as reference. |
| Setting | Description |
|---|---|
|
Name |
Enter an intuitive name for the LDAP server. |
|
Host |
IP address or DNS name of the LDAP server on which the AD is located. |
|
Port |
The LDAP port. Default: 389 |
|
Bind DN |
The DN (distinguished name) or username of the user used to bind to the LDAP server. For example: ldap@audiocodes.com |
|
Password |
Defines the LDAP password used to connect. |
|
Page size |
The ARM allows operators to control the page size retrieved from the LDAP server. This may help to reduce some of the strain from the ARM or from the LDAP server. It may also help in some cases where the LDAP server doesn’t return all the users defined in it. Note the final value is controlled by the LDAP server itself and cannot be defined above the value configured in the LDAP server. Configure a value in the range 1-10000. Default: 1000. |
|
Filter |
|
|
Base Object |
Consult the IT manager responsible for the Active Directory in the enterprise. The setting defines the full path (DN) to the object in the AD tree where the user's information is located. The valid value is a string of up to 256 characters. Example (read from right to left): ou=Users;ou=APC;ou=Israel;ou=as;dc=corp;dc=as;dc=com The DN path is defined by the LDAP names OU (organizational unit) and DC (domain component). |
|
Search object |
An LDAP search filter used when fetching the users from the LDAP server under the base DN. The default is 'objectClass=user'. |
|
SSL Configurations |
|
|
Enable SSL |
Enables or disables the connection over SSL. Default: Disable. When disabled, communications with the AD server will be open, i.e., unencoded/unencrypted. When left unchanged at the default; the Browse button adjacent to 'Certificate File to Upload' will be unavailable; when enabled, the Browse button becomes available. |
|
Certificate file |
Enables verification that it is the AD server and no other entity that is communicating with the ARM server. Allows you to browse for a root certificate. When the AD server then sends a certificate, the ARM server uses the root certificate to verify that it is the AD server and no other entity on the other side. Following verification, communications are SSL-encoded. |
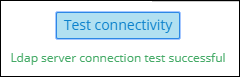
| 4. | Click Test Connectivity to test the connectivity between the ARM server and the AD server. |
| 5. | Click the LDAP Mapping tab. |
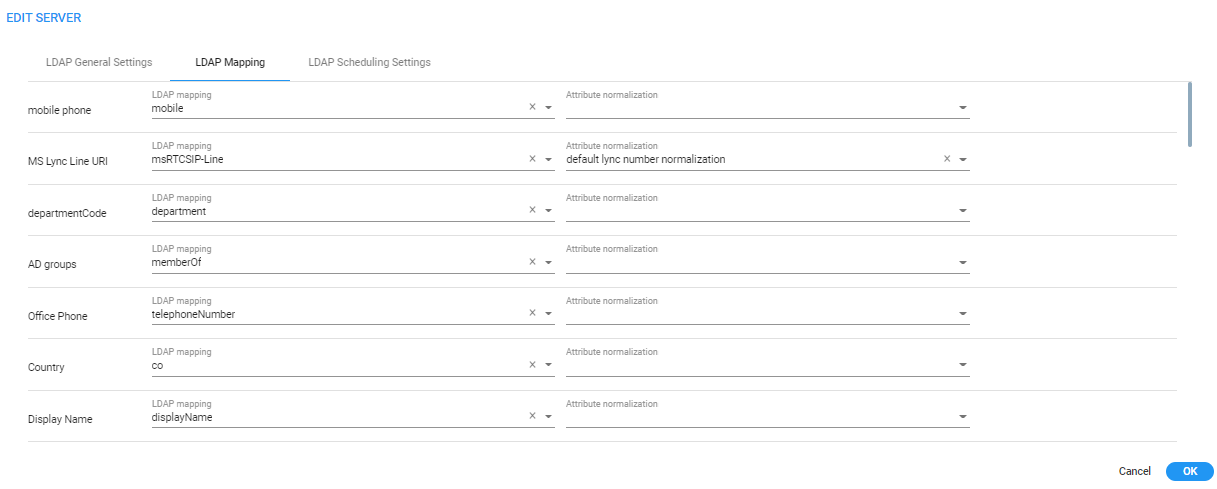
| ● | Property fields that display LDAP mappings are synced from the LDAP server |
| ✔ | Under LDAP Mapping click a field to select the property to map to the LDAP server -OR- enter the first letter or number in the field and if necessary, enter the second as well; the field is automatically populated (filled). LDAP schema typically include multiple attributes so this feature makes it easy for network operators to find an attribute. |
| ● | Property fields not displaying LDAP mappings can be mapped locally, in the ARM: |
| ✔ | Leave the property field empty and then in the Users page (Users > Users) open a user's User Details screen and edit the property there according to requirements (see Add a User Not Listed in an AD to the ARM) |
| ● | In the Property Dictionary page you can define a new property or edit an already defined property (see Add a Property Dictionary to the ARM) |
| ● | Each dialable Dictionary property has a default normalization which is performed on top of the defined normalization, if a defined normalization exists. This default normalization removes white spaces, minuses, semicolons and parentheses. The default normalization can be changed if needed. Contact your AudioCodes representative if you need to change it. |
| 6. | Click the LDAP Scheduling Settings tab. |
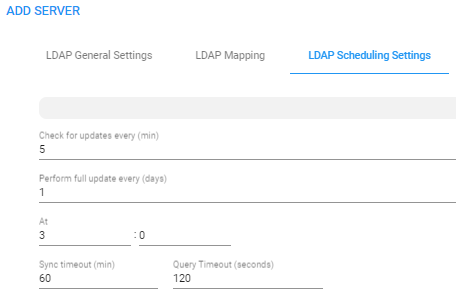
| 7. | Configure the LDAP Scheduling Settings using this table as reference. |
| Setting | Description |
|---|---|
|
Check for updates every n minutes |
Defines how frequently the ARM server checks the AD server for updates. Note that during the update, the ARM only obtains new AD users or relevant user information updates (only the delta). Default: Every 5 minutes |
|
Perform full update every n days at |
Defines how frequently the ARM server performs a full update from the AD server. Note that a full update is mainly required to remove users deleted from the organization's AD (this information cannot be obtained by an AD update). Default: Every day |
|
At |
At what time of day the full synchronization (in which the ARM server performs a full update from the AD server) will occur. Default: 0:0, i.e., midnight. Use the arrows to navigate to and select a time. In the preceding figure, the sync will occur every 10 days (frequency) at 00:00 hours (midnight). Default: 03:00 a.m. |
|
Sync timeout |
If the AD server doesn't answer within the period configured, the ARM server determines that the AD server is disconnected and a refresh is sent. Default: 60 minutes. |
|
Query Timeout (seconds) |
Default: 120 seconds. |
| ➢ | To attach a Normalization Group (Rule) to an LDAP property: |
| 1. | Select the row of the LDAP property to which to attach a Normalization Group. |
| 2. | In the property's Attribute Normalization field, select a Normalization Group. See Add a Normalization Group for information on how to configure a Normalization Group. |
| 3. | Click OK. |
| ➢ | To view the AD summary: |
| 1. | Open the Servers page (Users > Servers). |

| 2. | Select the AD whose summary you want to view. |
| 3. | Use the table as reference to the server's synchronization schedule. |
Server Summary
|
Sync every |
ARM and AD databases synchronization schedule. Displays the synchronization frequency: 1-48, i.e., between once every hour (most frequent) to once every two days (most infrequent). |
|
Full Sync at |
Displays the time (hour and minute) at which to start a full synchronization. Also displays the frequency: 1-7, i.e., between once a day (most frequent) to once a week (most infrequent). |
|
Last |
Displays the last time the ARM and the Active Directory databases were fully synchronized. |
| ➢ | To edit an LDAP server: |
| 1. | In the Users page under the LDAP Servers tab, select the server to edit and click Edit. |
| 2. | Edit using as reference the parameter descriptions when adding an LDAP server, and then click Test Connectivity to test the connection settings. |
| 3. | Click the LDAP Mapping tab; the same screen that opens when adding an LDAP server, shown previously, is displayed. Use as reference the same parameter descriptions as when adding an LDAP server. |
| ● | For each LDAP property's LDAP Mapping drop-down menu, select a mapping. Properties that have LDAP mappings are synced from the LDAP server. Properties that do not have LDAP mappings are empty and can be configured locally. |
| ● | Select the LDAP property to which to attach a Normalization Attribute and then from the property's Attribute Normalization drop-down menu, select a Normalization Group. See Add a Normalization Group for information about how to configure a Normalization Group. |
| 4. | Click OK. |
After updating an LDAP server, a full sync is started. After a short while (depending on the size and responsiveness of the LDAP server), you can view the updated users in the Users page.