Remote Provisioning and Sign-in from Teams Admin Center (TAC)
Network administrators can remotely provision and sign in to a Teams device. To provision a device remotely, the administrator needs to upload the MAC IDs of the devices being provisioned and create a verification code. The entire process can be completed remotely from the Teams Admin Center (TAC). For details and instructions, click here.
Remote provisioning sign-in makes it possible for a technician to access and set up the phone by entering a TAC generated code, without having to provide user credentials.
| ➢ | Step 1: Add a device MAC address |
Provision the device by imprinting a MAC address on it.
| 1. | Sign in to the Teams Admin Center. |
| 2. | Expand Devices. |
| 3. | Select Provision new device from the Actions tab. |
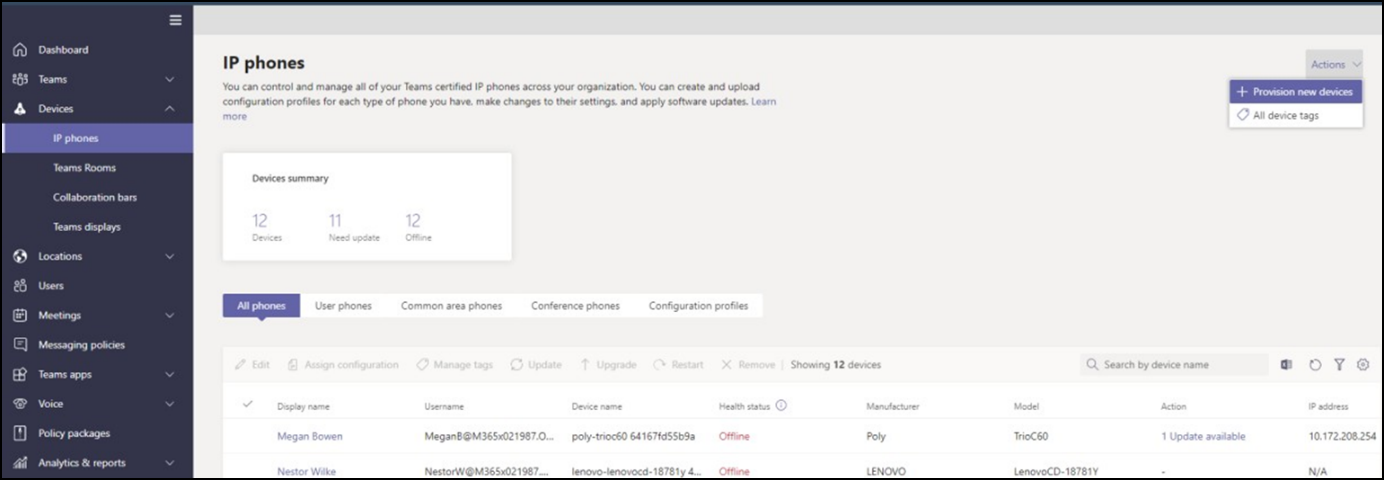
In the ‘Provision new devices’ window, you can either add the MAC address manually or upload a file.
Manually add a device MAC address
| 1. | From the Awaiting Activation tab, select Add MAC ID. |
| 2. | Enter the MAC ID. |
| 3. | Enter a location, which helps technicians identify where to install the devices. |
| 4. | Select Apply when finished. |
Upload a file to add a device MAC address
| 1. | From the Awaiting Activation tab, select Upload MAC IDs. |
| 2. | Download the file template. |
| 3. | Enter the MAC ID and location, and then save the file. |
| 4. | Select the file, and then select Upload. |
| ➢ | Step 2: Generate a verification code |
You need to generate a verification code for the devices. The verification code is generated in bulk or at the device level and is valid for 24 hours.
From the Awaiting Activation tab, select an existing MAC ID. A password is created for the MAC address and is shown in the Verification Code column.

You need to provide the list of MAC IDs and verification codes to the field technicians. You can export the details directly in a file and share the file with the technician who is doing the actual installation work.
| ➢ | Step 3: Provisioning on the device |
Once the device is powered up and connected to the network, the technician provisions the device:
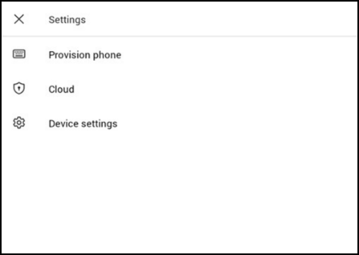
| 1. |
|
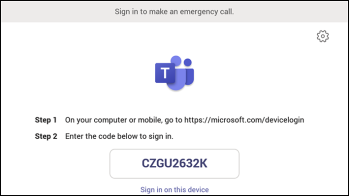
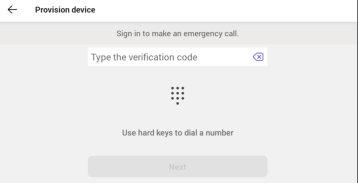
| 2. | On the Settings screen, |
| 3. | Types the device-specific verification code that was provided in the Teams Admin Center on the phone’s user interface. |
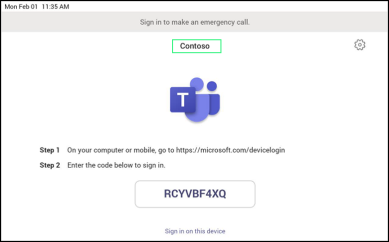
Once the device is provisioned successfully, the tenant name is available on the sign in page.
| ➢ | Step 4: Sign in remotely |
The provisioned device appears in the Awaiting sign in tab. Initiate the remote sign-in process by selecting the individual device.
| 1. | Select a device from the Awaiting sign in tab. |
| 2. | Follow the instructions in Sign in a user, and then select Close. |
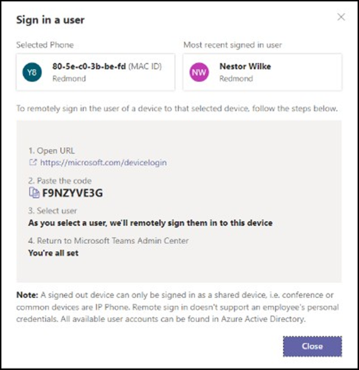
The tenant administrator then completes authentication on the device from any browser or smartphone.
When the tenant administrator is signing in from Teams Admin Center, the user interface on the device is blocked to prevent other actions on the phone: