Additional bot frameworks
The following procedure describes how to create a bot connection using Live Hub for the following bot frameworks:
-
AudioCodes Bot API
-
Koda
-
Any other bot framework that has implemented AudioCodes bot API
-
-
Rasa Pro
-
Rasa
-
Kore.AI
-
Amazon Lex
-
DRUID
-
Enterprise Bot
-
ChatBot Builder
-
Cognigy
-
Ideta
-
Inbenta
-
Haptik.AI
-
Creative Virtual
Define bot framework and details
First define bot framework and details. Then configure the speech-to-text and text-to-speech services.
To create a bot connection:
-
In the navigation menu pane, select Bot connections, and then click Add new voice bot connection or Add new assist bot connection; the following appears:
If you want to discontinue this step, click Close.
-
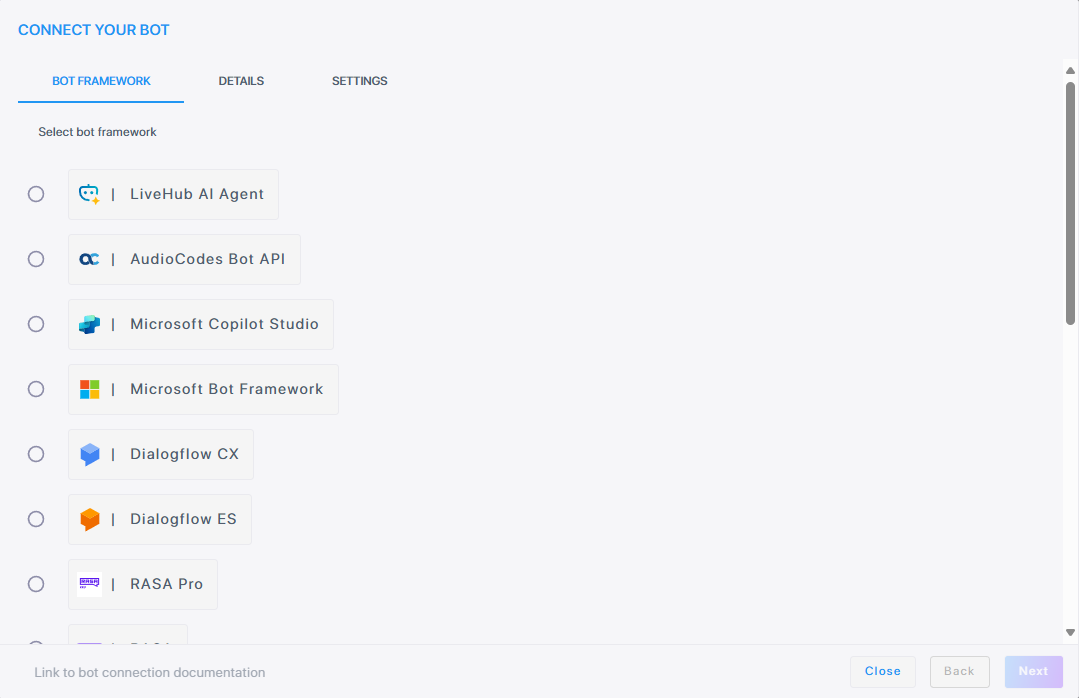
Select the bot framework, and then click Next; the following appears:
-
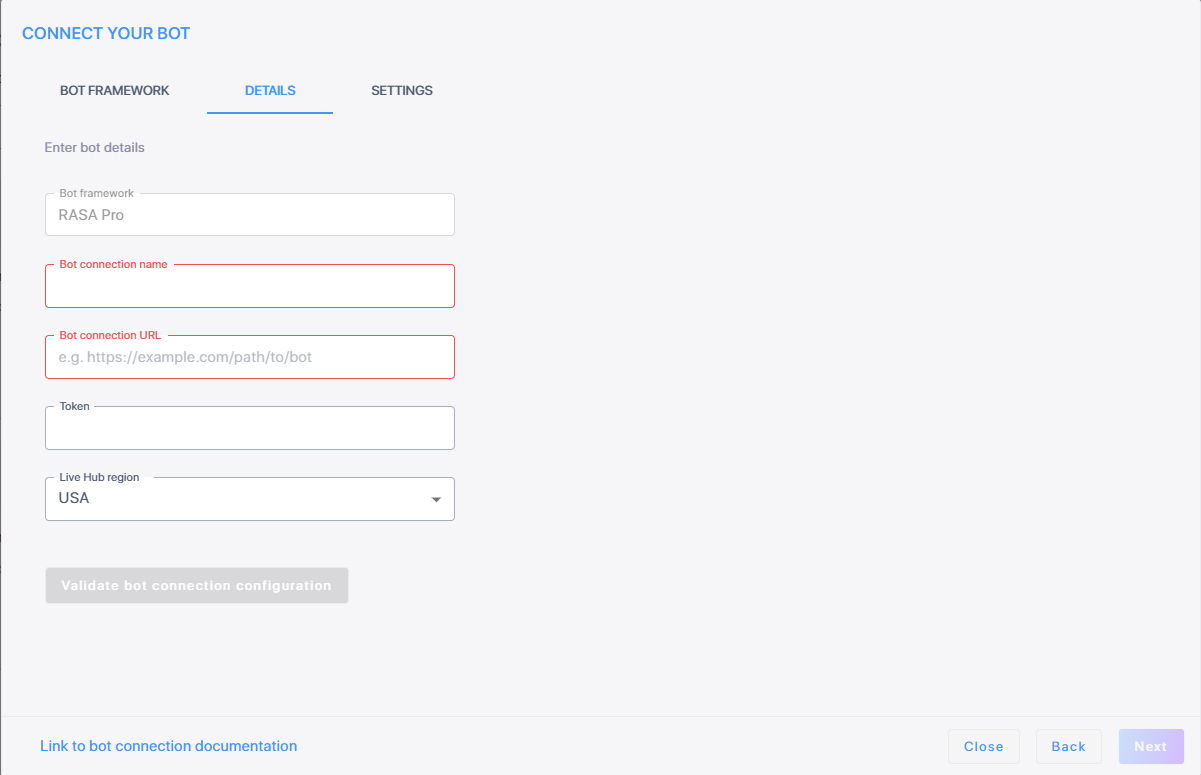
In the 'Bot framework' field, enter the bot framework you are using.
-
In the 'Bot connection name' field, enter the name for the bot.
-
In the 'Bot connection URL' field, enter the bot URL protocol for creating new conversations as defined in the AudioCodes Bot API.
-
In the 'Token' field, enter the bot access token. For more information on security, see AudioCodes Bot API.
-
From the 'Live Hub region' drop-down, select the geographical location (region) in which Live Hub voice infrastructure is deployed.
-
To validate the Bot URL and Token, click Validate bot configuration.
-
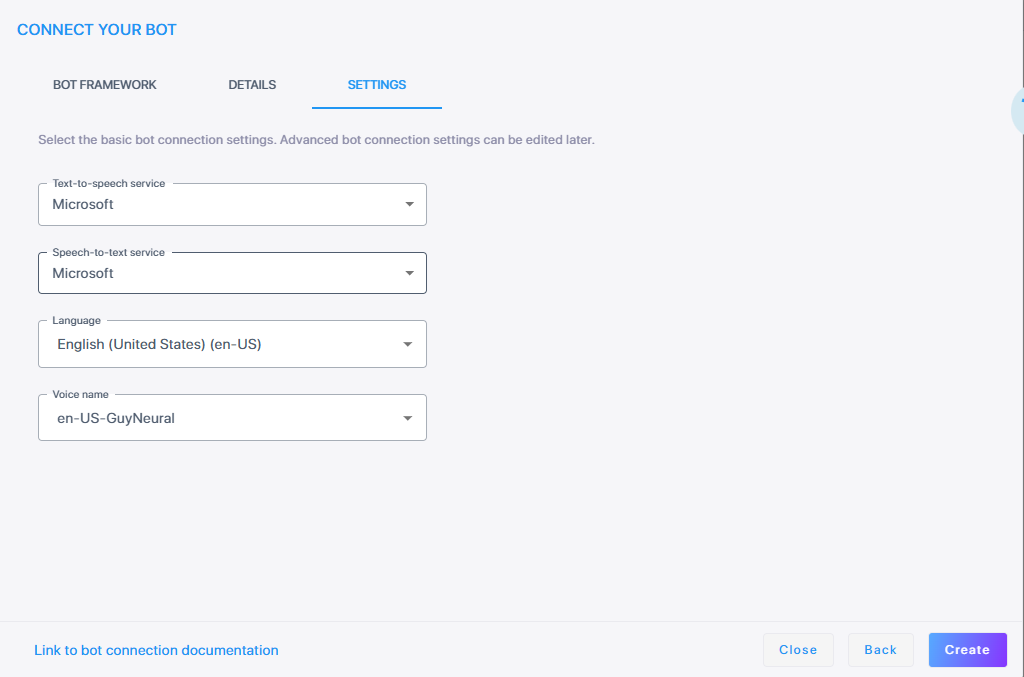
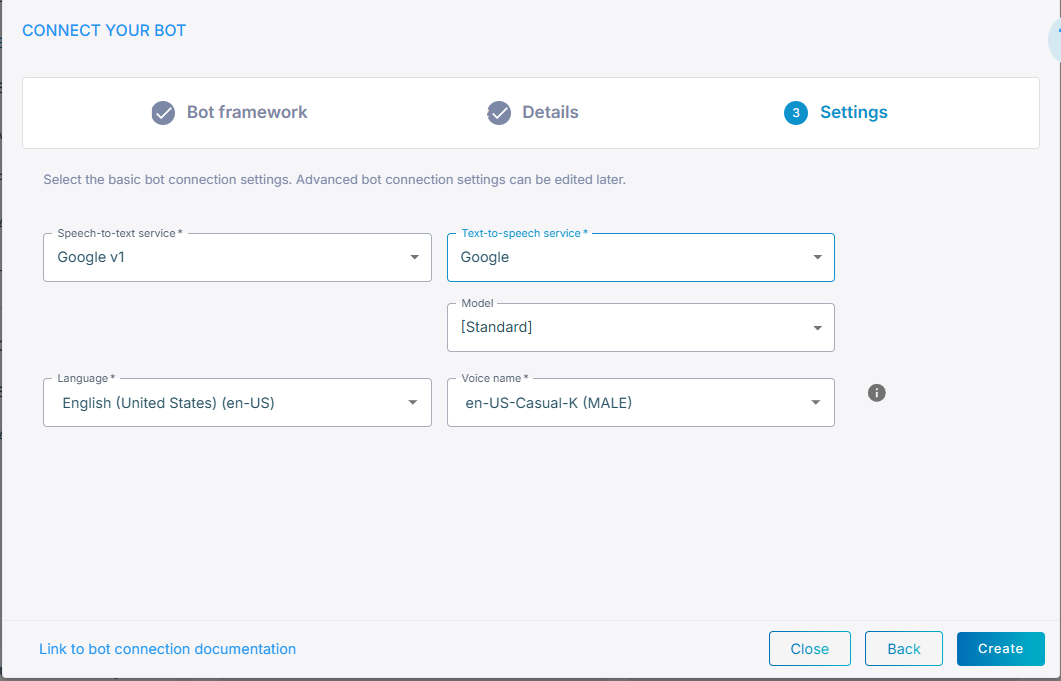
Click Next. The Settings screen displays different configuration options depending on which speech services you select.
-
Proceed to Configure Speech-to-Text service and then Configure Text-to-Speech service.
Configure Speech-to-Text service
Refer to the sections below for instructions on configuring your speech‑to‑text service. When done, continue to Configure Text-to-Speech service.
Microsoft
-
From the 'Speech-to-text service' drop-down list, select Microsoft.
-
From the 'Language' drop-down list, select the appropriate language.
Google V1
-
From the 'Speech-to-text service' drop-down list, select Google V1.
-
From the 'Language' drop-down list, select the appropriate language.
Google V2
-
From the 'Speech-to-text service' drop-down list, select Google V2.
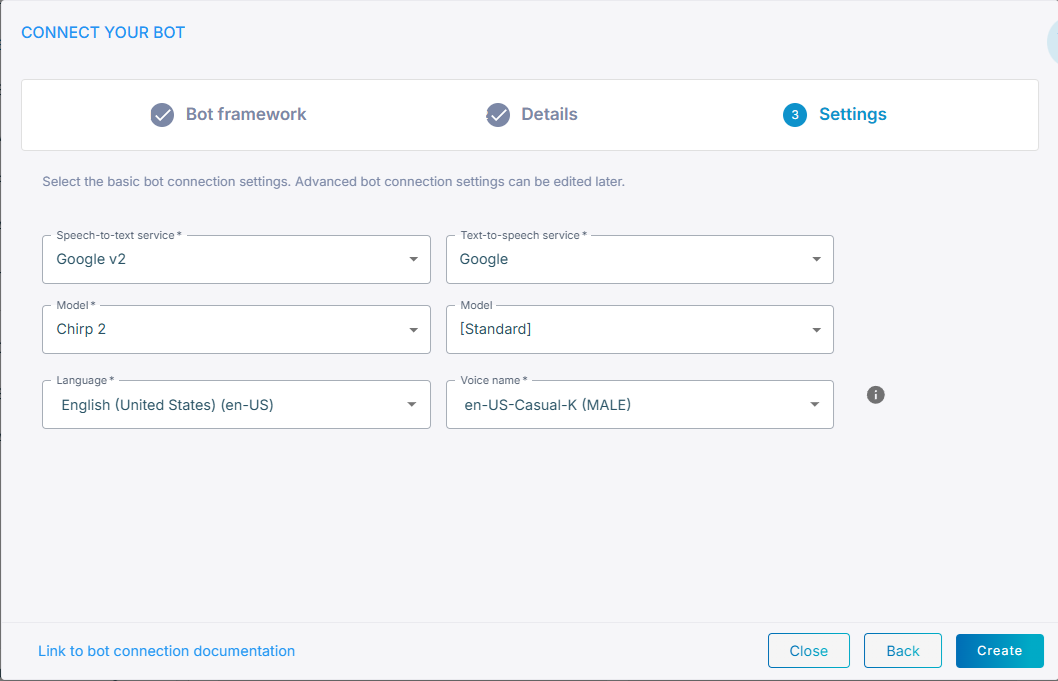
-
From the 'Model' drop-down list, select the speech recognition model (for example, Chirp 2).
-
From the 'Language' drop-down list, select the appropriate language.
Deepgram
-
From the 'Speech-to-text service' drop-down list, select Deepgram.
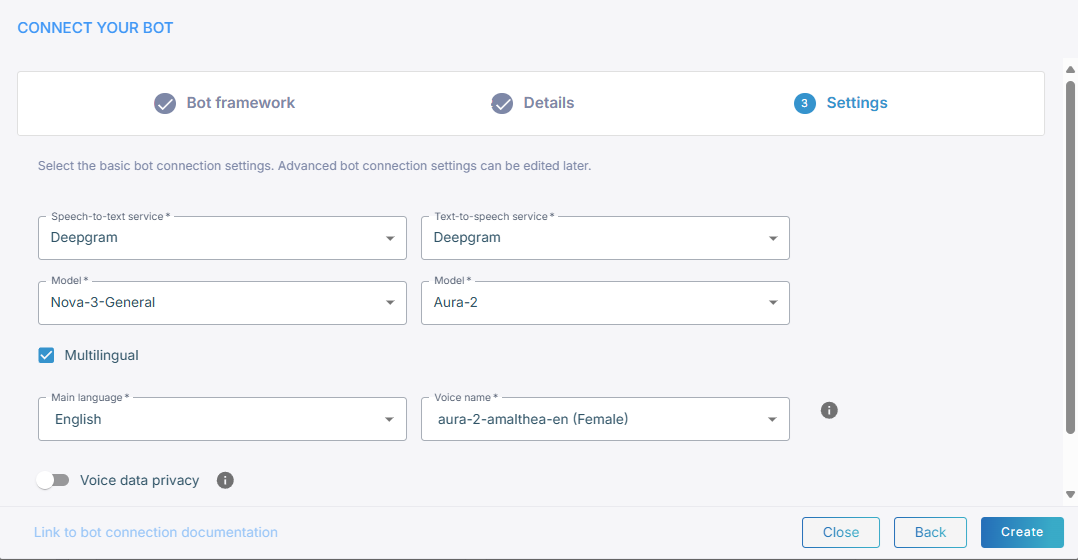
-
From the 'Model' drop-down list, select the speech recognition model (for example, Nova-3-General).
ElevenLabs
-
From the 'Speech-to-text service' drop-down list, select ElevenLabs.

-
From the 'Model' drop-down list, select speech recognition model (for example, Scribe V2 Realtime).
-
Click Create; the new bot connection is created.
Custom
-
From the Text‑to‑speech service drop‑down list, select Custom.
-
Continue with the steps that apply to the speech provider you configured.
Configure Text-to-Speech service
Refer to the sections below for instructions on configuring your text‑to‑speech service. When done, click Create; the new bot connection is created.
Microsoft
-
From the 'Text-to-speech service' drop-down list, select Microsoft.
-
From the 'Voice name' drop-down list, select the appropriate voice name.
-
Click Create; the new bot connection is created.
-
From the 'Text-to-speech service' drop-down list, select Google.
For manual Dialogflow bots, you can select any Speech-to-text and Text-to-speech providers from the drop-down lists including defined speech services.
-
From the 'Model' drop-down list, select the speech recognition model (for example, Gemini 2.5 Pro).
Note: If you experience a TTS timeout, consider increasing ttsConnectionTimeoutMS to a value greater than 5000 to improve stability.
-
From the 'Voice name' drop-down list, select the appropriate voice name.
-
Click Create; the new bot connection is created.
Amazon
-
From the 'Text-to-speech service' drop-down list, select Amazon.
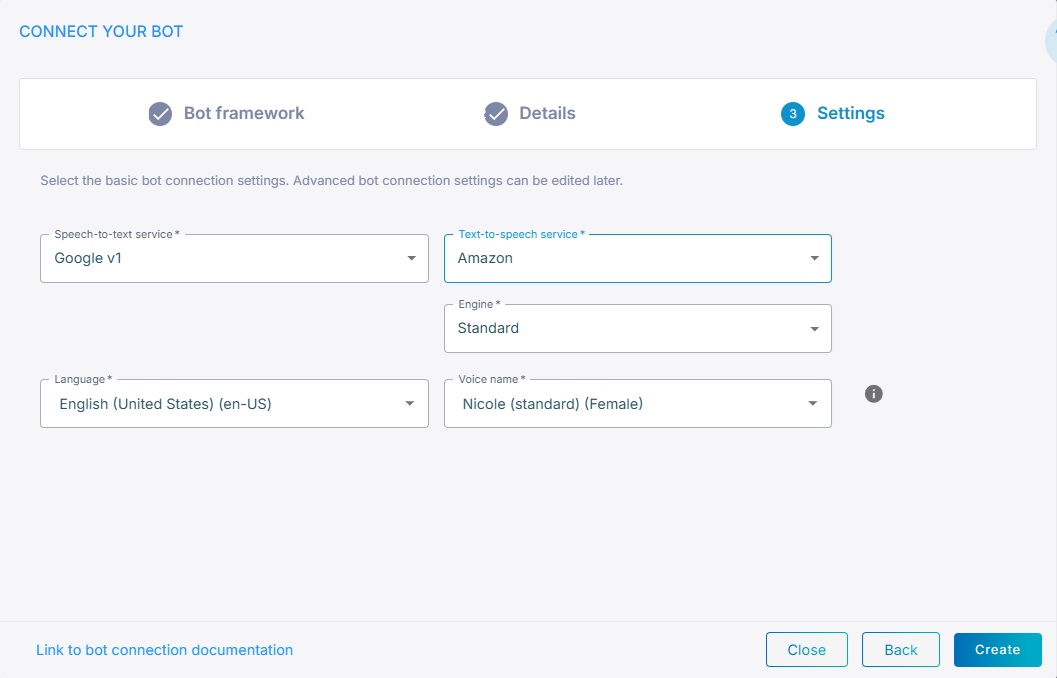
-
From the 'Engine' drop-down list, select the speech recognition engine.
-
From the 'Voice name' drop-down list, select the appropriate voice name.
-
Click Create; the new bot connection is created.
Deepgram
-
From the 'Text-to-speech service' drop-down list, select Deepgram.
For manual Dialogflow bots, you can select any Speech-to-text and Text-to-speech providers from the drop-down lists including defined speech services.
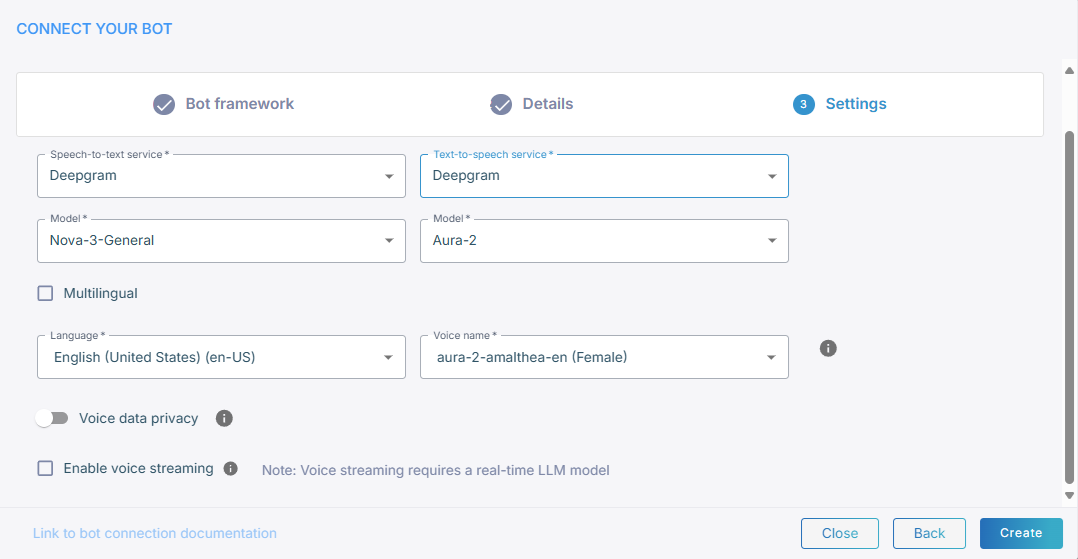
-
From the 'Model' drop-down list, select speech recognition model (for example, Aura-2).
-
Select Multilingual if you need multi-language support. When enabled, a 'Main language' field appears where you can define your main language.
-
If you didn’t select Multilingual, from the 'Language' drop-down list, select the appropriate language.
-
From the 'Voice name' drop-down list, select the appropriate voice name.
-
Toggle Allow Deepgram to use the audio data to improve its models to control whether Deepgram may use your audio data to improve its models. By default, this is enabled. When enabled, Deepgram may use the audio data to support advanced model development in accordance to Deepgram usage terms. Disabling this option will result in higher usage costs.
-
If you want voice streaming, select Enable voice streaming. Selecting this lets Live Hub stream voice directly between the bot and the user, instead of sending text. If you enable voice streaming, the speech-to-text and text-to-speech drop-down fields will no longer be displayed.
-
Voice streaming quires a real-time LLM model.
-
If you enable voice streaming, the speech-to-text and text-to-speech drop-down fields will no longer be displayed.
-
-
Click Create; the new bot connection is created.
ElevenLabs
-
From the 'Text-to-speech service' drop-down list, select ElevenLabs.
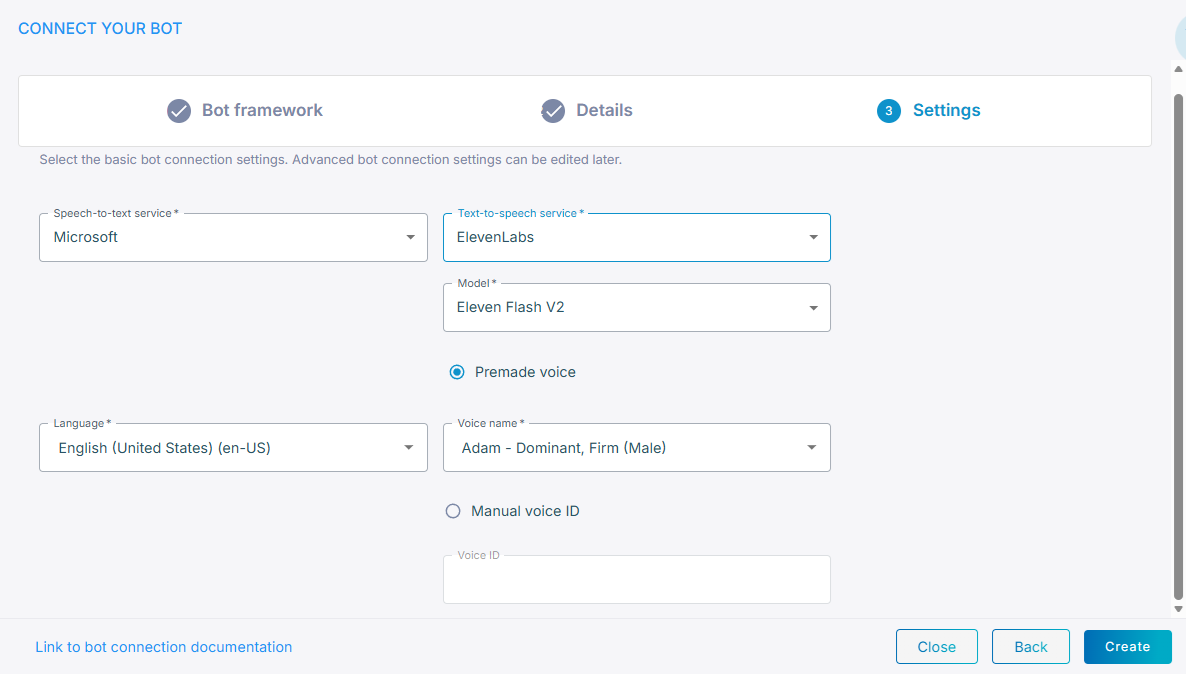
-
From the 'Model' drop-down list, select speech recognition model.
-
Select Premade voice or Manual voice ID.
-
If you selected Premade voice, enter the 'Voice name' that is provided by ElevenLabs.
-
If you selected Manual voice ID, choose the 'Voice ID' that you created.
-
Click Create; the new bot connection is created.
Custom
-
From the Text‑to‑speech service drop‑down list, select Custom.
-
Continue with the steps that apply to the speech provider you configured.