General Setup Page
The General Setup wizard page defines the network topology of the device, which includes the application (e.g., SIP trunk) and the involved third-party vendors, configuration template based on the selected vendor interoperability, and physical network (ports).
|
➢
|
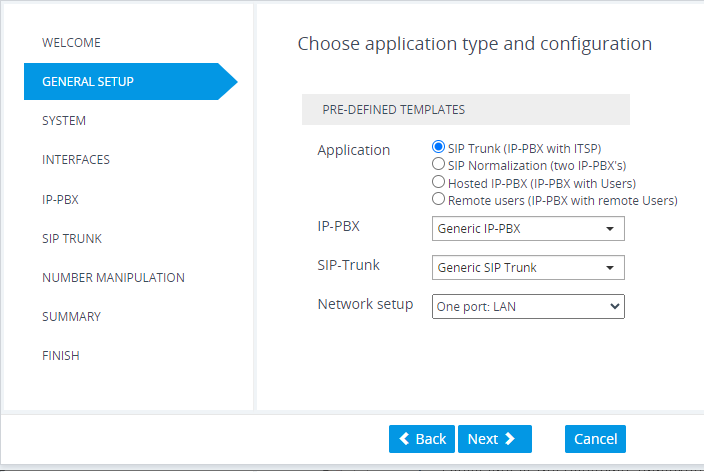
To define the general setup: |
|
1.
|
Select one of the following 'Application' options: |
|
●
|
SIP Trunk (IP-PBX with SIP Trunk): The device connects the Enterprise IP PBX with the Internet Telephony Service Provider (ITSP) or SIP Trunk Provider. The IP PBX resides on the Enterprise LAN, while the ITSP resides on the WAN. Only calls between the IP PBX and ITSP traverse the device. Calls between Enterprise phones, users and certain SIP messages (REGISTER, SUBSCRIBE and NOTIFY) are managed locally by the IP PBX and do not traverse the device. |
|
●
|
SIP Normalization (two IP-PBX's): The device performs SIP "normalization" of traffic between two IP PBXs. The first IP PBX resides on the Enterprise LAN (co-located with the device) and the second IP PBX resides on the WAN (or at another branch site). Only calls between the IP PBXs traverse the device. Calls between the phones and users of the same IP PBX, and certain SIP messages (REGISTER, SUBSCRIBE and NOTIFY) are managed locally by each IP PBX and do not traverse the device. |
|
●
|
Hosted IP-PBX (IP-PBX with Users): The device connects phones (users) with the "hosted" IP PBX. The users reside on the Enterprise LAN (co-located with the device) and the IP PBX resides on the WAN (or at the datacenter). All traffic between users and IP PBX traverse the device, including SIP REGISTER, SUBSCRIBE and NOTIFY messages. |
|
●
|
Remote Users (IP-PBX with Remote Users): The device connects remote phones (users) with the "local" IP PBX (additional IP PBX servers can be configured). The IP PBX resides on the Enterprise LAN (co-located with the device) and the remote users reside on the WAN (or at the datacenter). All traffic between users and IP PBX traverse the device, including SIP REGISTER, SUBSCRIBE and NOTIFY messages. |
|
2.
|
If you selected the SIP Trunk application in Step 1, do the following: |
|
a.
|
From the 'IP-PBX' drop-down list, select the IP PBX model. If the model is not listed, select Generic IP-PBX. |
|
b.
|
From the 'SIP-Trunk' drop-down list, select the SIP trunk provider. If the provider is not listed, select Generic SIP Trunk. |
|
3.
|
From the 'Network Setup' drop-down list, select the physical network topology: |
|
●
|
Two ports: LAN and WAN: The device connects to the network through two separate physical network links (interfaces). The first interface ("LAN") is connected to the Enterprise LAN (typically, a switch) and has a private IP address. The second interface ("WAN") is connected to the DMZ port of the Enterprise router and has a public (globally routable) IP address. Each link may be accompanied with a backup link for Ethernet link redundancy. |
|
●
|
One port: LAN: The device connects to the Enterprise LAN (typically, a switch) through a single physical network link (interface). The interface ("LAN") has a private IP address. You must enable port forwarding on the Enterprise router to forward all VoIP traffic from the ITSP (located on the WAN) to the device. The exact port forwarding configuration is shown on the Conclusion page and consists of the device's address, SIP port (e.g. 5060) and a media port range (e.g. 6000-6999). |
|
●
|
One port: WAN: The device connects to the DMZ port of the Enterprise router through a single physical network link (interface). The interface ("WAN") has a public (globally routable) IP address. You must enable port forwarding on the Enterprise router to forward all VoIP traffic from the device to the IP PBX (located on the LAN). The exact port forwarding configuration is shown on the Conclusion page and consists of the IP PBX address, SIP port (e.g. 5060) and a media port range (e.g. 6000-6999). |
|
●
|
One port: LAN only: The device connects to the Enterprise LAN (typically, a switch) through a single physical network link (interface). All SIP entities (IP PBX and users) connect to the same LAN. Note that this option is applicable to all applications (see Step 1), except SIP Trunk. |
|
4.
|
Click Next; the System page appears (see System Page). |