Device Settings Configured by Administrator
To view or configure administrator-level C436HD device settings and debugging options, you need to log in as administrator. Navigate to Device Settings > Device Administration > Device Administration.
Administrator login is password protected. The default password is 1234 (or 1111 in early versions) and must be changed at the first login.
Device settings only available for administrators include Modify network and Debugging.
Modify network
Modify network settings enable administrators to determine network information and to modify network settings:
|
■
|
IP Settings [DHCP or Static IP] |
|
■
|
Network state [Read Only] |
LLDP switch information is retrieved (for location purposes) when the parameter 'network/lan/lldp/enabled'=1 (even when VLAN is retrieved from CDP or VLAN is disabled or VLAN is Manual). In versions prior to 1.19, if network VLAN mode ‘network/lan/vlan/mode’ was set to LLDP, the phone retrieved the VLAN and LLDP switch information (for location purposes) from LLDP.
Proxy
The phone can be configured with an HTTP (or HTTPS) Proxy server by an Admin user in two ways:
|
■
|
Manually. The Admin user can use this method to configure HTTP proxy server parameters through the Teams application: |
|
a.
|
Log in as Administrator and select Modify network. |
|
b.
|
Select the Proxy option and then configure the proxy host name and port: |
|
■
|
Over DHCP with Option 252. It's recommended that the Admin user uses this method when provisioning multiple phones. Option 252 provides a DHCP client with a URL to use to configure its proxy settings: |
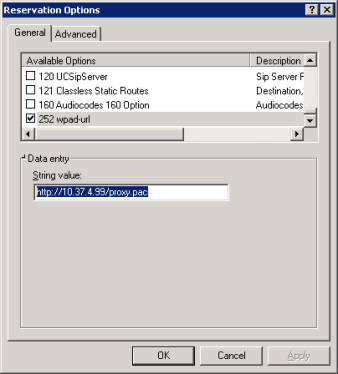
The proxy setting is provided in a Proxy Auto-Configuration (PAC) file that contains a set of rules coded in JavaScript which allows a web browser to determine whether to send web traffic directly to the Internet or to be sent via a proxy server. PAC files control how the phone handles HTTP, HTTPS and FTP traffic.
Example of a basic PAC file:
function FindProxyForURL(url, host)
{
return "PROXY 10.13.2.40:3128";
}
If the enterprise features a proxy server that requires user authentication, the network administrator can use the PAC file and DHCP Option 252 to configure the proxy server. Alternatively, the administrator can configure the proxy server using the following parameters:
http_client/fwd_proxy/ip=
http_client/fwd_proxy/password=
http_client/fwd_proxy/port=8080
http_client/fwd_proxy/username=
802.1x Settings
802.1x Authentication is the IEEE Standard for Port-based Network Access Control (PNAC). See https://1.ieee802.org/security/802-1x/ for more information.
Instead of performing the following steps, 802.1x Authentication can be enabled and predefined via provisioning, by setting the following parameters:
network/lan/_802_1x/status=true or false
network/lan/_802_1x/eap_tls/ca_cert=<CA FILE NAME>
network/lan/_802_1x/eap_tls/client_cert=<Client certificate file name>
network/lan/_802_1x/eap_tls/identity=<identity name>
network/lan/_802_1x/eap_type=eap_tls
|
➢
|
To configure an 802.1x Authentication method:
|
|
1.
|
After logging in as administrator, go to the ‘Modify Network’ screen and access the 802.1x Settings screen. |
|
2.
|
Select the Enable 802.1x toggle switch and then select Save. |
|
3.
|
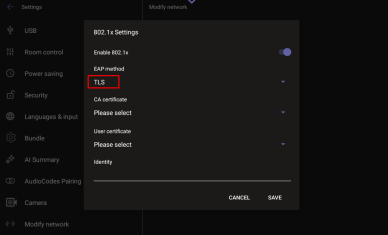
Once enabled, the administrator needs to choose the security method and strength. Commonly used is EAP-TLS. |
|
4.
|
Next is to choose which certificates to use: |
|
a.
|
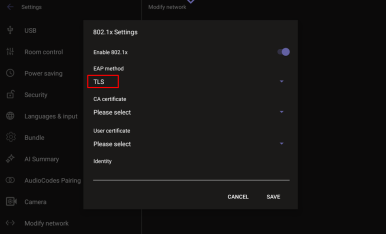
The device can use the system certificates - |
|
b.
|
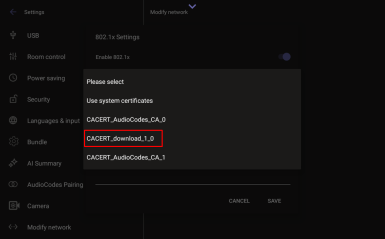
Or a certificate that has been loaded by the administrator, which will look as follows: |
|
5.
|
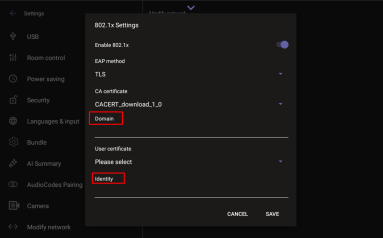
After choosing which certificate file to use, the administrator needs to set the Identity and the Domain the device is intended to enter: |
|
6.
|
Select Save after defining all the above. |
|
7.
|
From the 'EAP method' drop-down, select the method: MD5 or TLS (for example). |
In version 2.3, the option for non-validating a CA certificate was removed.
|
8.
|
Enter this information:
|
|
●
|
Root certificate (not required for every method) |
|
●
|
Device certificate (not required for every method) |
|
9.
|
Press the Save softkey. |
The 802.1x settings are not only available via the phone screen, they are also supported in the device Configuration File, enabling network administrators to perform pre-staging configuration for 802.1x. The 802.1x settings available in the Configuration File are:
VLAN Settings
Navigate to VLAN Settings > VLAN Discovery mode.
Select the mode you require as per the following guidelines, and then select OK:
|
■
|
Cisco Discovery Protocol (CDP) is a Cisco proprietary Data Link Layer protocol. |
|
■
|
Link Layer Discovery Protocol (LLDP) is a standard, layer two discovery protocol. |
|
■
|
If you select Automatic configuration (DCP, LLDP or both), you need to specify the VLAN Interval or leave it at its default value (30 seconds). The VLAN interval refers to CDP/LLDP advertisements' periodic interval. You can increase or decrease the intervals between the CDP/LLDP packets that are sent, based on network traffic and topology. |
|
■
|
If you select Manual configuration, you need to specify the VLAN ID and VLAN Priority. Changes will only be applied after these fields have been set. |
Debugging
Allows the Admin user to perform debugging for troubleshooting purposes. Available after logging in as administrator.
|
■
|
Erase all data (factory reset) (the equivalent of restore to defaults; including logout and device reboot) |
|
■
|
SSH – if enabled, allows remote connection via SSH. This option must be enabled to use the rpcapd (Remote Packet Capture) network sniffer application for capturing screenshots and traffic packages from a desktop PC using the app's integral SSH server. |
|
■
|
Screen capture – enabled by default. If disabled, the phone won't allow its screens to be captured. |
|
■
|
Remote packet capture – enables capturing traffic packages using rpcapd. |
|
■
|
Advanced > Rediscover provisioning server – use to let the device detect the applicable provisioning server and retrieve configuration settin |