Configure Device Settings
The section familiarizes you with the phone’s settings. Phones are delivered to customers configured with their default settings. Customers can customize these settings to suit specific personal or enterprise requirements.
| ➢ | To access device settings: |
| 1. |
|
| 2. | View the settings under 'User'. |
Device Settings
|
Setting |
Description |
|||||||||||||||||||||||||||||||||||||||||||||||||||||||||
|---|---|---|---|---|---|---|---|---|---|---|---|---|---|---|---|---|---|---|---|---|---|---|---|---|---|---|---|---|---|---|---|---|---|---|---|---|---|---|---|---|---|---|---|---|---|---|---|---|---|---|---|---|---|---|---|---|---|---|
|
User |
||||||||||||||||||||||||||||||||||||||||||||||||||||||||||
|
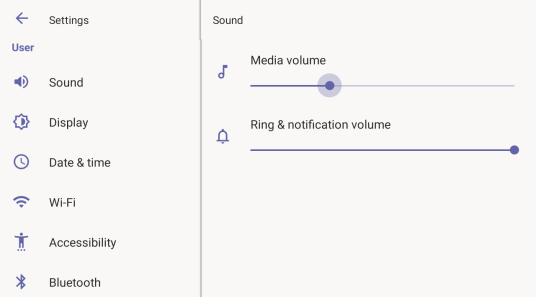
Sound |
Allows you to customize the phone volume for a friendlier user experience:
|
|||||||||||||||||||||||||||||||||||||||||||||||||||||||||
|
Display |
Opens the ‘Display’ screen, where you can adjust:
|
|||||||||||||||||||||||||||||||||||||||||||||||||||||||||
|
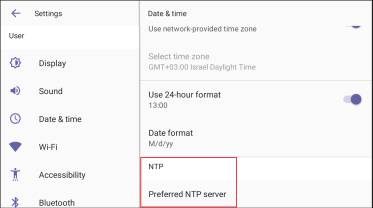
Date & time |
Also supported is a simplified version of NTP called Simple Network Time Protocol (SNTP). Both can be used to synchronize device clocks. SNTP is typically used if full implementation of NTP is not required. |
|||||||||||||||||||||||||||||||||||||||||||||||||||||||||
|
NTP Preferred NTP server |
Administrators can use this parameter to manually define the NTP server, to comply with enterprise security requirements if those requirements preclude using DHCP Option 42. Manual configuration takes precedence over DHCP Option 42 and the time servers. Two ways to manually define the NTP server are available:
See also Sign In to Your Teams Phone. |
|||||||||||||||||||||||||||||||||||||||||||||||||||||||||
|
Wi-Fi |
[Only available for phones with integrated Wi-Fi (DBW-suffix)] The phone can connect to an Access Point via Wi-Fi. See the phone's Quick Guide for detailed information on setting up Wi-Fi. See also Configure Wi-Fi in this document for information about configuring the feature. |
|||||||||||||||||||||||||||||||||||||||||||||||||||||||||
|
Accessibility |
Allows making the screen reader-friendlier:
|
|||||||||||||||||||||||||||||||||||||||||||||||||||||||||
|
Bluetooth |
[Only available for phones with integrated Bluetooth (DBW-suffix)] Hands free profile where the phone is able to connect to Bluetooth headset or speaker. |
|||||||||||||||||||||||||||||||||||||||||||||||||||||||||
|
USB |
If enabled, allows the phone to be used as an audio device (see Enable a Phone to be used as an Audio Device). |
|||||||||||||||||||||||||||||||||||||||||||||||||||||||||
|
Speaker Mode |
Use to enable or disable the speaker. If disabled, the user needs to speak into the handset during calls. |
|||||||||||||||||||||||||||||||||||||||||||||||||||||||||
|
Power Saving |
Allows users to contribute to power saving in the enterprise. Set:
|
|||||||||||||||||||||||||||||||||||||||||||||||||||||||||
|
Reboot |
Enables users to reboot the device. Log in as Administrator for more debugging settings to be available. |
|||||||||||||||||||||||||||||||||||||||||||||||||||||||||
|
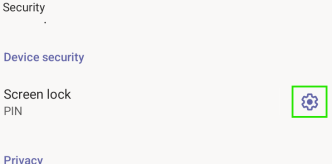
Security |
Helps secure the enterprise telephony network against breaches.
Tap to change the timeout (default is 10 minutes) after which the phone automatically locks and is inaccessible to anyone who does not know its lock code. If you are using a Pattern lock, you can also make the pattern briefly visible when you draw the pattern.
|
|||||||||||||||||||||||||||||||||||||||||||||||||||||||||
|
Touch screen |
Allows users to disable the phone’s touch screen (for example, to clean it without tapping buttons). |
|||||||||||||||||||||||||||||||||||||||||||||||||||||||||
|
Languages |
Allows users to customize inputting to suit personal requirements. |
|||||||||||||||||||||||||||||||||||||||||||||||||||||||||
|
AudioCodes pairing |
Displays the name of the phone and allows you to pair it to a nearby connected PC. |
|||||||||||||||||||||||||||||||||||||||||||||||||||||||||
|
About device |
Provides users with device information.
|
|||||||||||||||||||||||||||||||||||||||||||||||||||||||||
|
|
||||||||||||||||||||||||||||||||||||||||||||||||||||||||||
|
Allows the user to log in as Administrator (see Log in as Administrator), necessary for some network configuration and debugging options. It is password protected. The default password is 1234 After logging in as an Administrator, the user can log out or change the password.
|
||||||||||||||||||||||||||||||||||||||||||||||||||||||||||
|
Modify network |
Enables the Admin user to determine network information and to modify network settings.
Note that LLDP switch information is retrieved (for location purposes) when the parameter 'network/lan/lldp/enabled'=1 (even when VLAN is retrieved from CDP or VLAN is disabled or VLAN is Manual). |
|||||||||||||||||||||||||||||||||||||||||||||||||||||||||
|
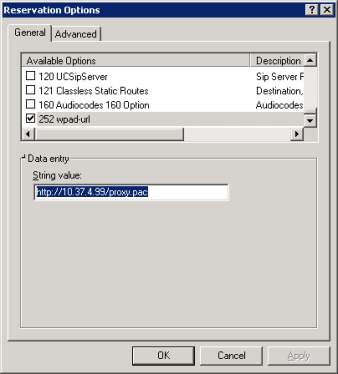
Proxy |
The phone can be configured with an HTTP (or HTTPS) Proxy server by an Admin user in two ways:
The proxy setting is provided in a Proxy Auto-Configuration (PAC) file that contains a set of rules coded in JavaScript which allows a web browser to determine whether to send web traffic directly to the Internet or to be sent via a proxy server. PAC files control how the phone handles HTTP, HTTPS and FTP traffic. Example of a basic PAC file: function FindProxyForURL(url, host) { return "PROXY 10.13.2.40:3128"; } If the enterprise features a proxy server that requires user authentication, the network administrator can use the PAC file and DHCP Option 252 to configure it. Alternatively, the administrator can configure it using the following parameters: http_client/fwd_proxy/ip=0.0.0.0 http_client/fwd_proxy/password= http_client/fwd_proxy/port=8080 http_client/fwd_proxy/username= |
|||||||||||||||||||||||||||||||||||||||||||||||||||||||||
|
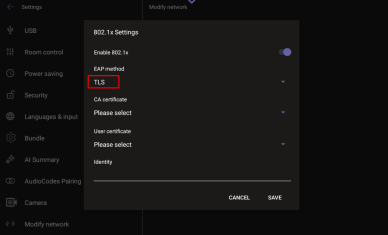
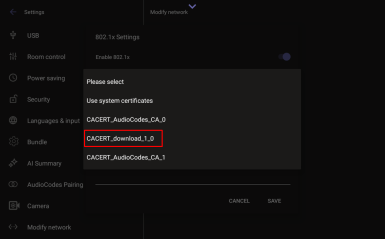
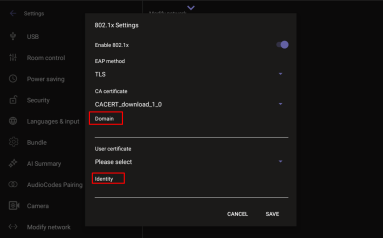
802.1x Authentication is the IEEE Standard for Port-based Network Access Control (PNAC). See https://1.ieee802.org/security/802-1x/ for more information. Instead of performing the following steps, 802.1x Authentication can be enabled and predefined via provisioning, by setting the following parameters: network/lan/_802_1x/status=true or false network/lan/_802_1x/eap_tls/ca_cert=<CA FILE NAME> network/lan/_802_1x/eap_tls/client_cert=<Client certificate file name> network/lan/_802_1x/eap_tls/identity=<identity name> network/lan/_802_1x/eap_type=eap_tls To configure an 802.1x Authentication method:
In version 2.3, the option for non-validating a CA certificate was removed.
The 802.1x settings are not only available via the phone screen, they are also supported in the device Configuration File, enabling network administrators to perform pre-staging configuration for 802.1x. The 802.1x settings available in the Configuration File are:
|
||||||||||||||||||||||||||||||||||||||||||||||||||||||||||
|
Navigate to VLAN Settings > VLAN Discovery mode.
|
||||||||||||||||||||||||||||||||||||||||||||||||||||||||||
|
Debugging |
Allows the Admin user to perform debugging for troubleshooting purposes. Available after logging in as administrator.
|
|||||||||||||||||||||||||||||||||||||||||||||||||||||||||