Use AudioCodes Click-to-Call SDK
AudioCodes Click-to-Call SDK provides the building blocks that allow users to initiate calls from popular browsers of their choice (e.g., Chrome, Safari, and Edge), or mobile Android and iOS devices without any additional plug-ins or software installations.
A typical solution is comprised of a WebRTC Gateway that connects WebRTC-based clients to SIP-based VoIP systems (such as a contact center). The WebRTC Gateway functionality is provided by Live Hub, while customers leverage AudioCodes SDK for creating Click-to-Call applications used on a web page or a mobile app.
Add Click-to-Call for Desktop Web Browsers
You can add Click-to-Call by using either one of the following:
Use the Click-to-Call JavaScript Widget
If you are targeting desktop users accessing your website, you can directly deploy our Click-to-Call JavaScript Widget on your web page, providing a straightforward way to integrate VoIP calls functionality into your website. For your ease, Live Hub provides you with several JavaScript widget examples that you can embed in your website.
To use the Click-to-Call JavaScript widget:
-
Navigate to the SIP connection's page.
-
On the SIP connection card you created for Click-to-Call, click the download
 icon.
icon.
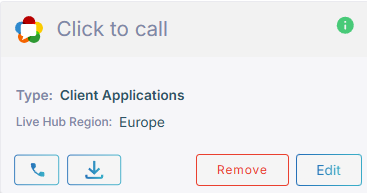
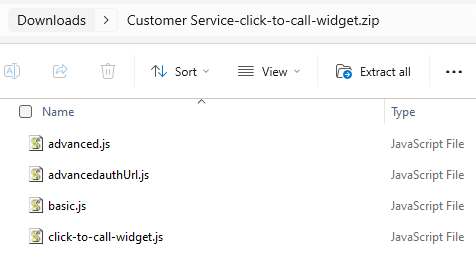
The JavaScript example files are generated and downloaded to your computer. The files are unique per each SIP connection you created.
-
-
-
Click-to-Call can be used without any authentication, however, it is not recommended.
-
The recommended authentication method is using authentication code (number 3 or 4 in the table below). For more details, see Authenticate using authentication code.
Type
File Name
Action
1
Main file
click-to-call-widget.js This main file should be stored on your server and integrated into your front-end deployment. It can be used by all SIP (Session Initiation Protocol) connections.
Note: This file is needed for all authentications.
2
Basic authentication
basic.js Use this file for Click-to-Call basic authentication.
-
Copy and paste the content of the basic.js file into your main .html file, within a <script> tag.
-
Replace the below values with the values defined in your SIP connection:
-
"caller": "REPLACE_USERNAME",
-
"password": "REPLACE_PASSWORD"
-
3
Session Cookie authentication
advancedauthUrl.js Use this file when authenticating the user with session-cookies.
This authentication type is implemented using the Click-to-Call authentication code. For more information, see Authenticate using authentication code.
-
Copy and paste the content of the advancedauthUrl.js file into your main .html file, within a <script> tag.
-
Replace "authURL":"" with endpoint of your back-end server.
-
The back-end server will request a authentication code from Live Hub server. Obtain the ApplicationID token from the IAM (Identity and Access Management) service.
-
Click-to-Call automatically generates a request to back-end server for authentication code for each call.
4
Bearer Token authentication
advanced.js Use this file when authenticating the user with bearer tokens.
This authentication type is implemented using the Click-to-Call authentication code. For more information, see Authenticate using authentication code.
-
Copy and paste the content of the advanced.js file into your main .html file, within a <script> tag.
-
Replace the generateCode function with your own implementation and return authentication code from Live Hub.
For example:
function generateCode(config, payload) {
    return fetch('REPLACE_URL', {});
}
This generates an HTTP request to the server with a bearer token. The server will then request Live Hub and return the authentication code.
-
-
Click the widget to initiate calls.
For additional information, refer to the WebRTC Click-to-Call Widget Installation and Configuration Guide.
Use the Click-to-Call Web SDK
Alternatively, to integrate VoIP calls functionality into your web applications, you can add Click-to-Call functionality by leveraging our web SDK for the functionality you need. This option allows you to build your own web application on top of the SDK.
To use the Click-to-Call Web SDK:
-
Create a web page where you want to embed the Click-to-Call functionality.
-
Call the Click-to-Call Web SDK from your web page code. This SDK abstracts the underlying WebRTC call management, allowing you to focus on creating a seamless user experience.
-
Customize the web page appearance and behavior according to your needs.
For additional information, refer to the WebRTC Web Browser Client SDK API Reference Guide.
Customize Style of Click-to-Call Widget
You can customize the appearance of the Click-to-Call widget on your website. You can use CSS or JavaScript for styling, depending on the level of customization required. See examples demonstrating of how to modify the Click-to-Call button’s style using ::part and JavaScript, Customize Click-to-Call widgets.
Add Click-to-Call for Mobile Devices (iOS and Android)
For mobile users, you can seamlessly integrate Click-to-Call functionality into your iOS or Android app.
Use the Mobile SDK for iOS Devices
You can incorporate the AudioCodes iOS SDK into your mobile app project.
To use the mobile SDK for iOS devices:
-
Initialize the SDK with the necessary configuration (e.g., SBC domain, user credentials).
-
Users within your app can now make WebRTC calls directly.
For additional information, refer to the WebRTC iOS Client SDK API Reference Guide.
Use the Mobile SDK for Android Devices
You can incorporate the AudioCodes Android SDK into your mobile app project.
To use the mobile SDK for android devices:
-
Initialize the SDK with the necessary configuration (e.g., SBC domain, user credentials).
-
Users within your app can now make WebRTC calls directly.
For additional information, refer to the WebRTC Android Client SDK API Reference Guide.
Obtain the Click-to-Call SDK software package
To obtain the SDK software package, contact AudioCodes Live Hub support using the chat channel or open a support request.