Replacing the Fan Tray Module
The procedure below describes how to replace the Fan Tray module.
|
●
|
DO NOT operate the device without the Fan Tray module. |
|
●
|
Before replacing the Fan Tray module, make sure that you have the replacement Fan Tray module on hand so that you can immediately replace the failed module with it. |
|
●
|
When removing the Fan Tray module, the blades may still be rotating at high speeds (even after the device has recently been switched off). Therefore, partially extract the module from the chassis and then wait a few seconds to allow the blades to stop, prior to extracting the module entirely from the chassis. |
|
➢
|
To replace the Fan Tray module: |
|
1.
|
Remove the faulty Fan Tray module: |
|
a.
|
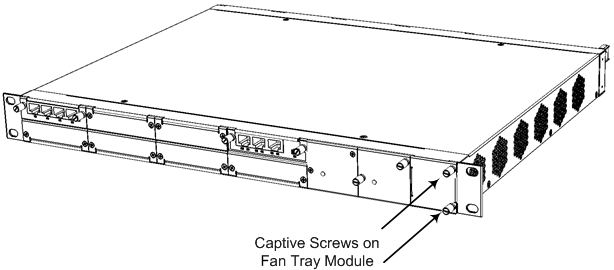
Locate the two captive screws on the front panel of the Fan Tray module. |
Captive Screws of Fan Tray Module
|
b.
|
Loosen the two screws using your fingers or a flat-head screwdriver. |
|
c.
|
Grip and pull the two screws of the Fan Tray module to gently slide the module out of the chassis slot. |
|
2.
|
Install the new Fan Tray module: |
|
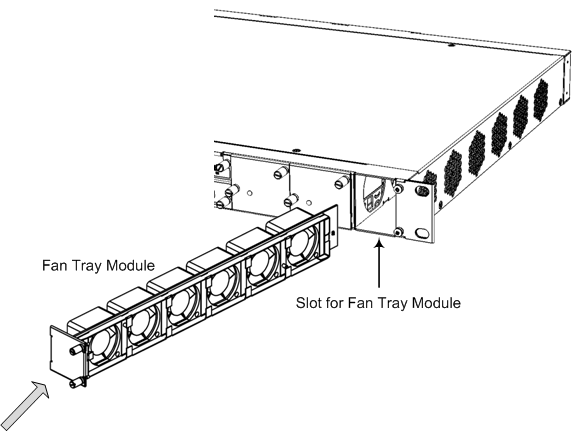
a.
|
Align the module with the guiding rails located in the chassis slot. |
Installing Fan Try Module
|
b.
|
Gently push the module into the slot until it is engaged with the chassis backplane and the module's front panel is flush with the chassis front panel plate. |
|
c.
|
Using your fingers or a flat-head screwdriver, tighten the two captive screws on the front panel of the Fan Tray module to secure the module to the chassis. |