Replacing Power Supply Modules
This section describes how to replace a Power Supply module.
The Power Supply modules are hot-swappable. Therefore, if you are replacing only one module, you can leave the second module connected to its power source.
Before removing a Power Supply module:
|
●
|
DC Power Supply module: Shut off the power from the power source. |
|
●
|
AC Power Supply module: Disconnect the power cable. |
|
➢
|
To replace a Power Supply module: |
|
1.
|
Remove the faulty Power Supply module, located on the rear panel: |
|
a.
|
Disconnect the power to the faulty module: |
|
◆
|
DC Power Supply module: Turn off the circuit breaker for the power feed to the module. Make sure that the power LED on the module is off. Remove the DC wires from the module's terminal block. |
|
◆
|
AC Power Supply module: Disconnect one end of the power cord from your power source, by pulling the power plug out of the electrical wall outlet. Remove the plug at the other end of the power cord from the power inlet on the faulty Power Supply module. Make sure that the power LED on the module is off. |
|
a.
|
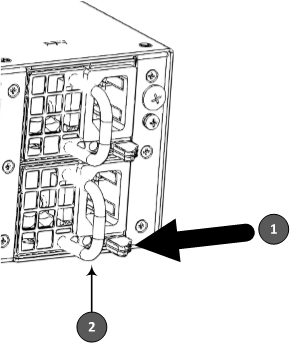
On the faulty Power Supply module, push the release latch leftward toward the extraction handle (see #1 in the following figure) and keep it in this position; this retracts the latch that secures the module to the chassis. While keeping the release latch in the left position, grip the handle of the faulty Power Supply module (see #2 in the following figure) and gently pull the module halfway out of the chassis slot: |
Handle and Release Latch on Power Supply Module (e.g., AC Power Supply Module)

|
b.
|
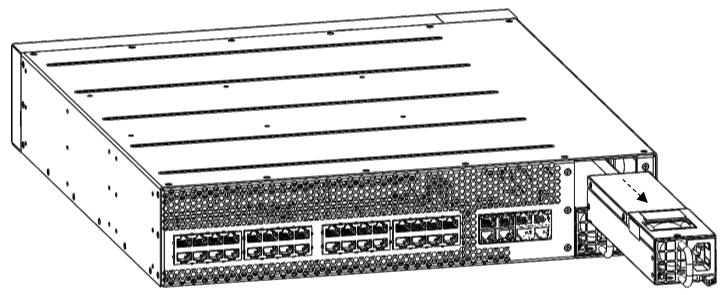
Place your other hand under the faulty module for support and then slide the module completely out of the chassis. Avoid touching the top of the module as it may be hot from being in the chassis. |
Removing Power Supply Module from Chassis (e.g., AC Power Supply Module)

|
2.
|
Install the new Power Supply module: |
|
a.
|
Grip the handle of the module with one hand while supporting it underneath with the other hand. |
|
b.
|
Orientate the module as shown in the previous figure and align it with the chassis slot from which you removed the faulty module. |
|
c.
|
Gently insert the module into the slot until it has engaged fully with the chassis backplane and a "click" sound heard when the release latch of the module locks it into the slot. |
|
d.
|
Connect the module to the power source. |

