Adding Service Provider Tenants
This procedure describes how to add a new Service Provider tenant for managing multiple service types.
| ➢ | Do the following: |
| 1. | In the Menu , choose Topology and then select the Tenants tab. |
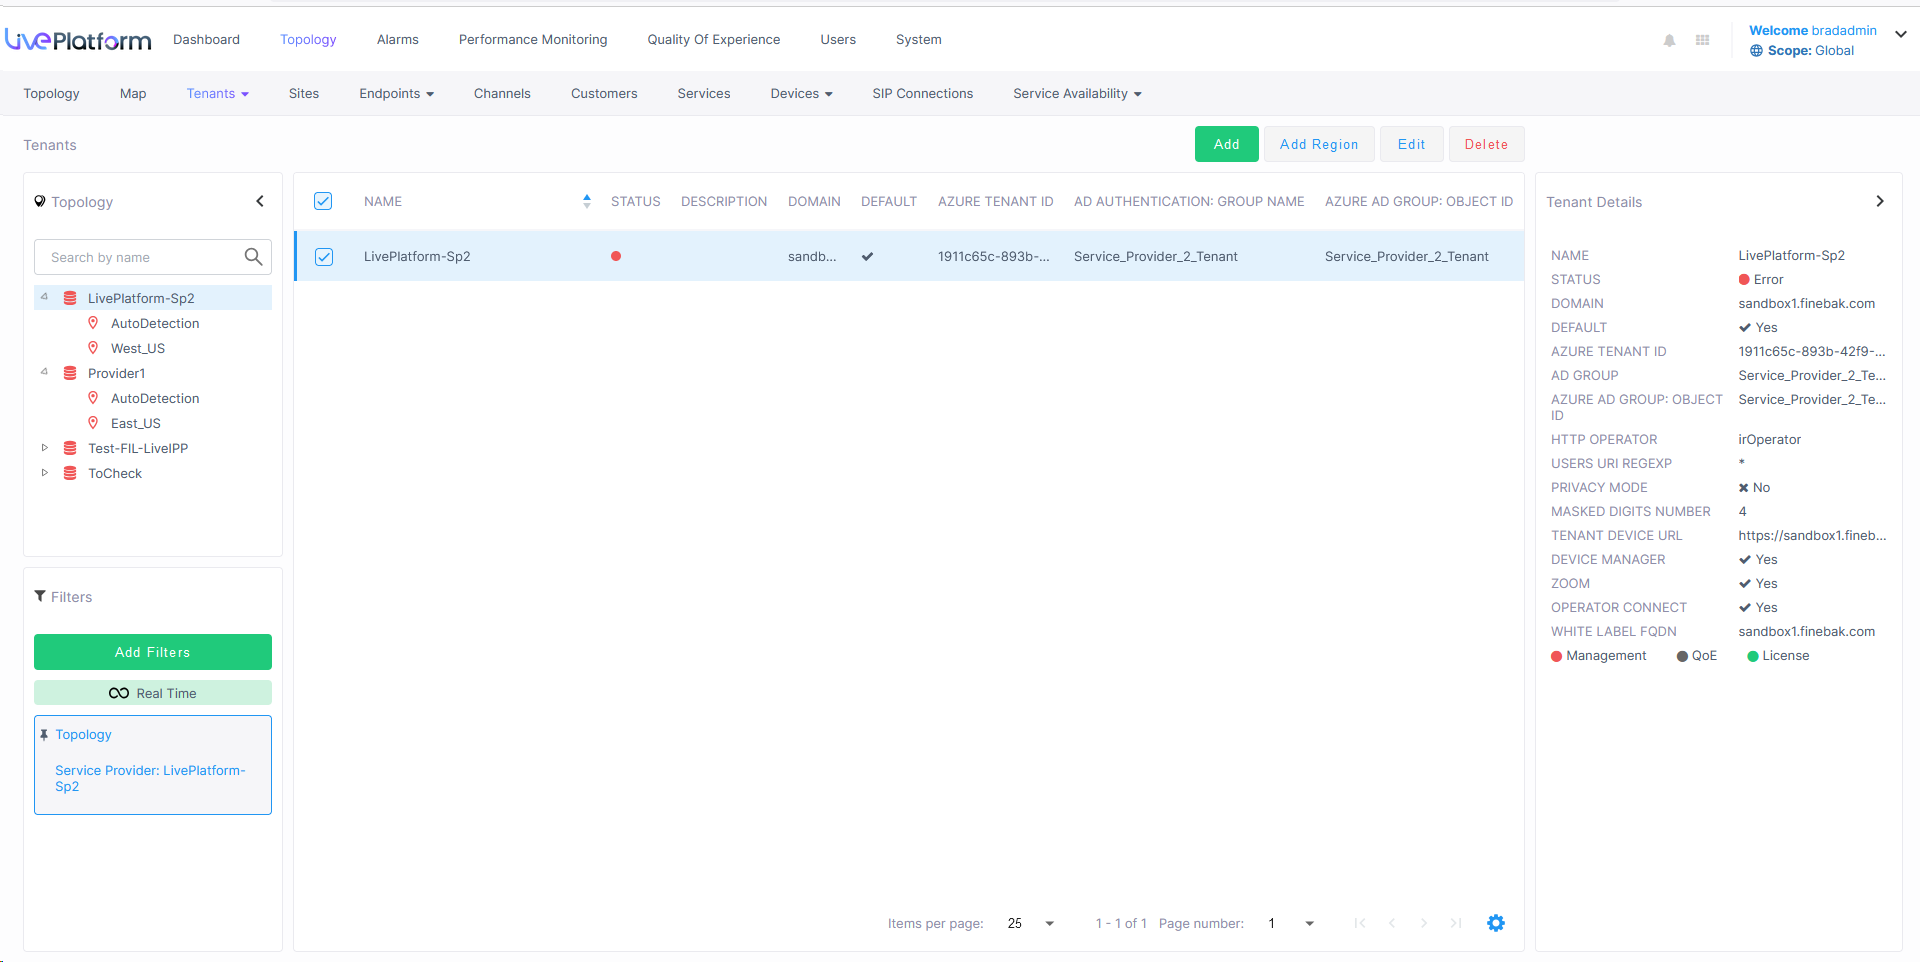
| 2. | Click Add. |
| 3. | Configure parameters according to the table below: |
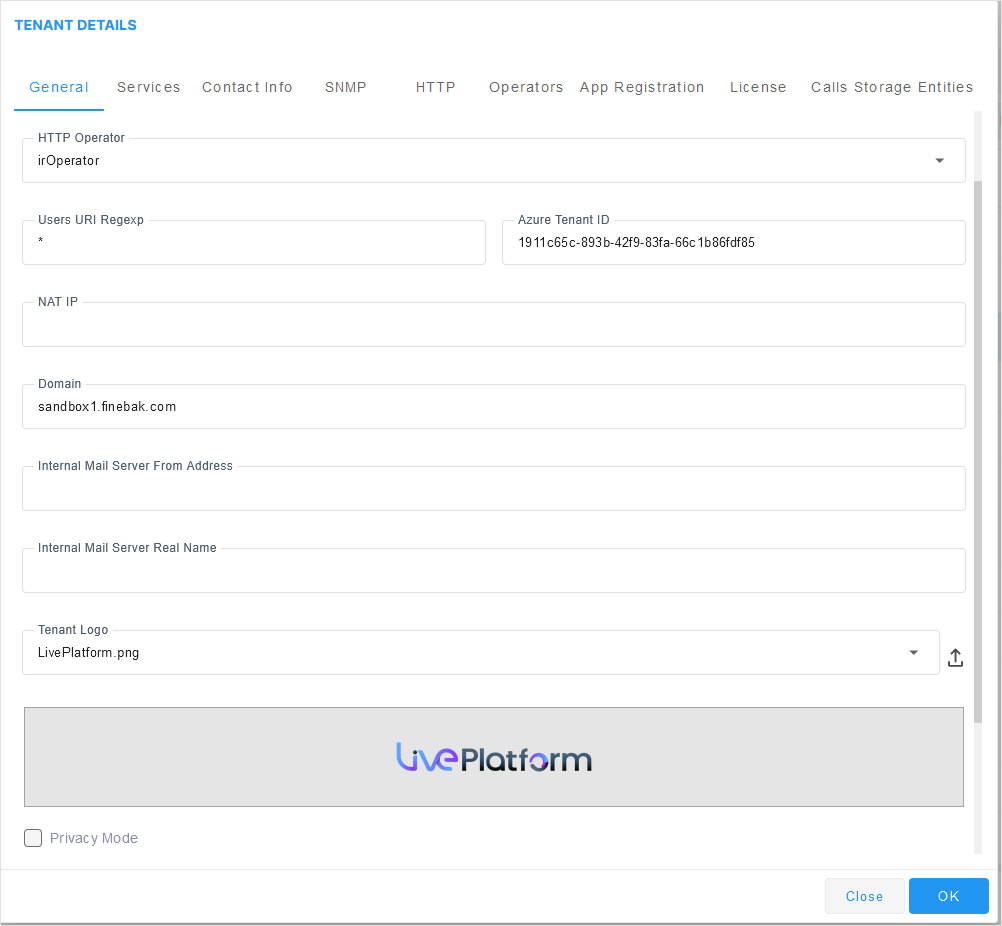
Tenant Details - General
|
Parameter |
Description |
||||||||||||
|---|---|---|---|---|---|---|---|---|---|---|---|---|---|
|
Tenant Name |
Enter the name of the Service Provider account. |
||||||||||||
|
Description |
Brief description of the tenant. |
||||||||||||
|
Is Default |
See also Connecting Devices Automatically |
||||||||||||
|
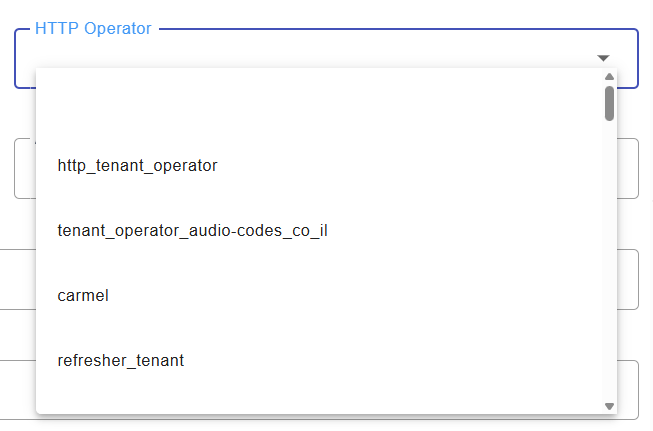
HTTP Operator |
From the drop-down, select the operator for managing services running on devices that connect directly to Live Platform over HTTP. This connection is used for files transfer (upload and download) and REST communication. Connection requests sent to Live Platform by these devices are managed through this operator.
This operator is used by the following services:
|
||||||||||||
|
Users URI Regexp |
This parameter facilitates generating statistics on calls made exclusively from URIs in a specific tenant. Operators can run a regional expression to find the URIs associated with the specific tenant and then generate statistics exclusively on them.
If in a five minute interval there are more than 2000 different URIs,the URI statistics for this five minute interval will not be saved. |
||||||||||||
|
Azure Tenant ID |
Service Provider Microsoft Entra ID. |
||||||||||||
|
IAM Account ID |
ID string of the Identity and Access Management account of the Service Provider tenant. |
||||||||||||
|
NAT IP |
This option can be configured when Live Platform is deployed behind a different NAT to customer tenants. It allows the configuration of an applicative level NAT interface for each tenant domain; Devices’ incoming communication like SNMP traps, license reports and file upload/download will communicate via the tenants’ NAT interface. |
||||||||||||
|
Domain |
The name of the tenant domain that is used for connecting devices to Live Platform. When defined and the parameter "FQDN Support for Auto-Detection" is enabled (see Global Configuration), devices that are connected to Live Platform are automatically added under the relevant tenant instead of to the default Auto Detection region. |
||||||||||||
|
Internal Mail Server from Address |
If your enterprise uses Live Platform's internal email server for Alarms Forwarding, use this parameter to configure the internal mail server’s 'From Address'. For example, if you configure adelev@TrunkOperator.com for this parameter and you configure 'Adele Vance' for the parameter following in this table ('Internal Mail Server Real Name'), then all alarms forwarded from Live Platform by email from rules configured with 'Use Internal Mail Server' will be from address: adelev@TrunkOperator.com |
||||||||||||
|
Internal Mail Server Real Name |
The corresponding name of the System Administrator configured for the 'Internal Mail Server from Address' above. |
||||||||||||
|
Privacy Mode |
Enables the Privacy Mode for configuring the number of Masked Digits (see below). |
||||||||||||
|
Masked Digits Number |
The number of digits to mask from phone numbers in the Calls details. |
||||||||||||
|
Call Syslog Access |
Enables the Service Provider tenant to download Syslog files for CDRs in the Calls Details (see Viewing Call Details). |
||||||||||||
|
Source Email |
Source email of the Service Provider tenant. |
||||||||||||
|
Allowed Alarms (in addition to service level alarms) |
Selects the alarms that are visible to the Service Provider tenant (not including Service level alarms). To allow all alarms, click All. |
| 4. | Click the Services tab. |
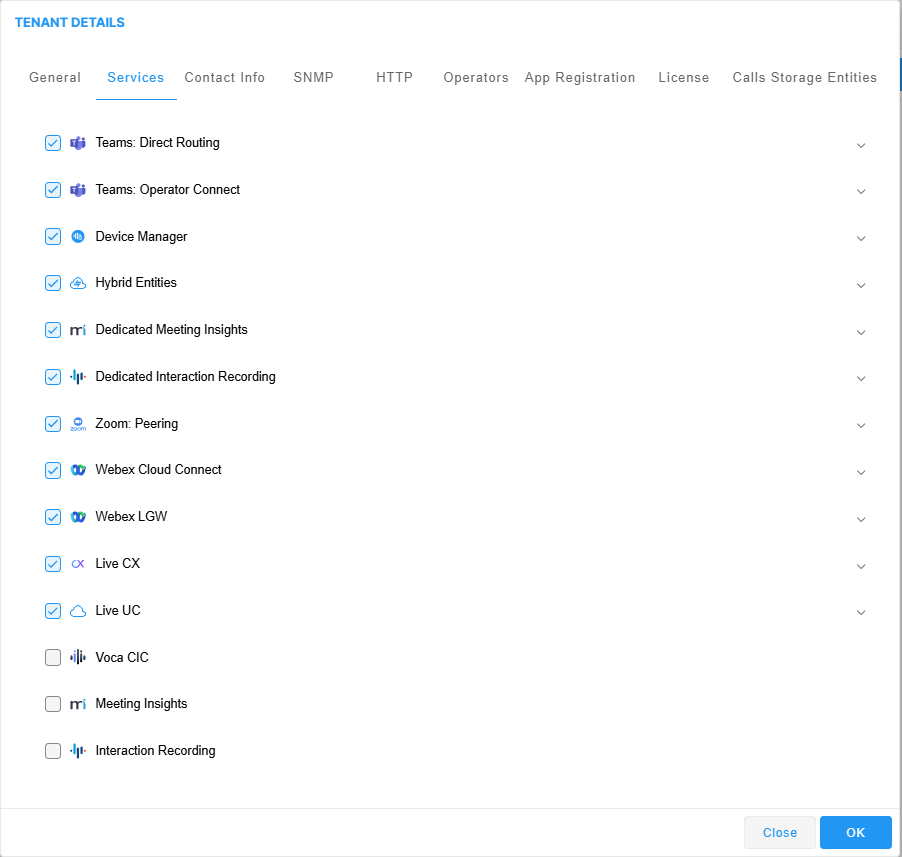
| 5. | Select the Check box adjacent to the services that you wish to enable for the tenant. |

| 6. | Click the down arrow to configure the Live Setup ID metering tag, see Metering Reports |
You cannot disable support of the Hybrid entities service if there are existing customers attached to a Hybrid service.
| 7. | Perform additional configuration for specific services according to the table below. |
|
|
|
|||||||||||||||
|---|---|---|---|---|---|---|---|---|---|---|---|---|---|---|---|---|
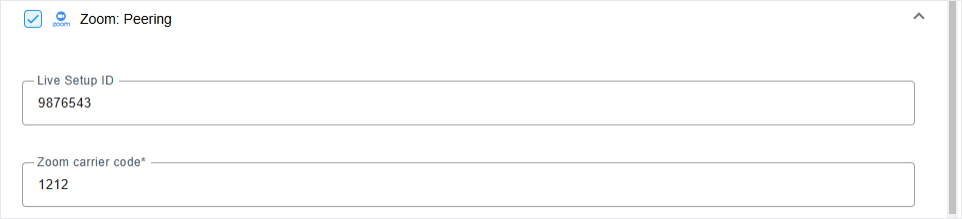
| Zoom Carrier Exchange |
Enter the Zoom carrier code. |
|||||||||||||||
|
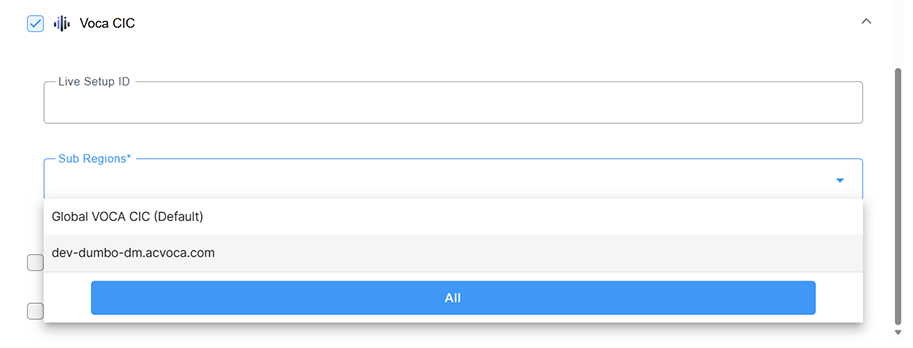
Voca CIC |
From the Sub Regions list, select the Voca CIC devices to attach to the tenant. Each sub region represents a configured Network tenant (see Adding Network Tenants). You can add multiple sub regions. When adding Voca CIC services, you attach the relevant sub region according to this listing. |
|||||||||||||||
|
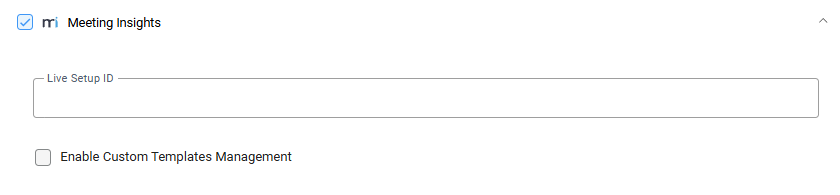
Meeting Insights |
Select Enable Custom Templates Management to enable the use of Custom templates. |
|||||||||||||||
|
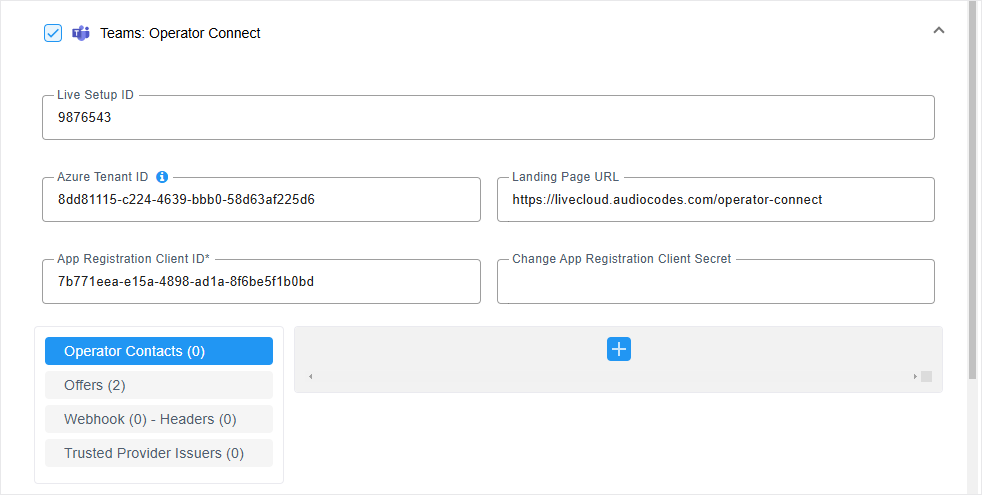
Operator Connect |
||||||||||||||||
|
|
|
|||||||||||||||
|
Azure Tenant ID |
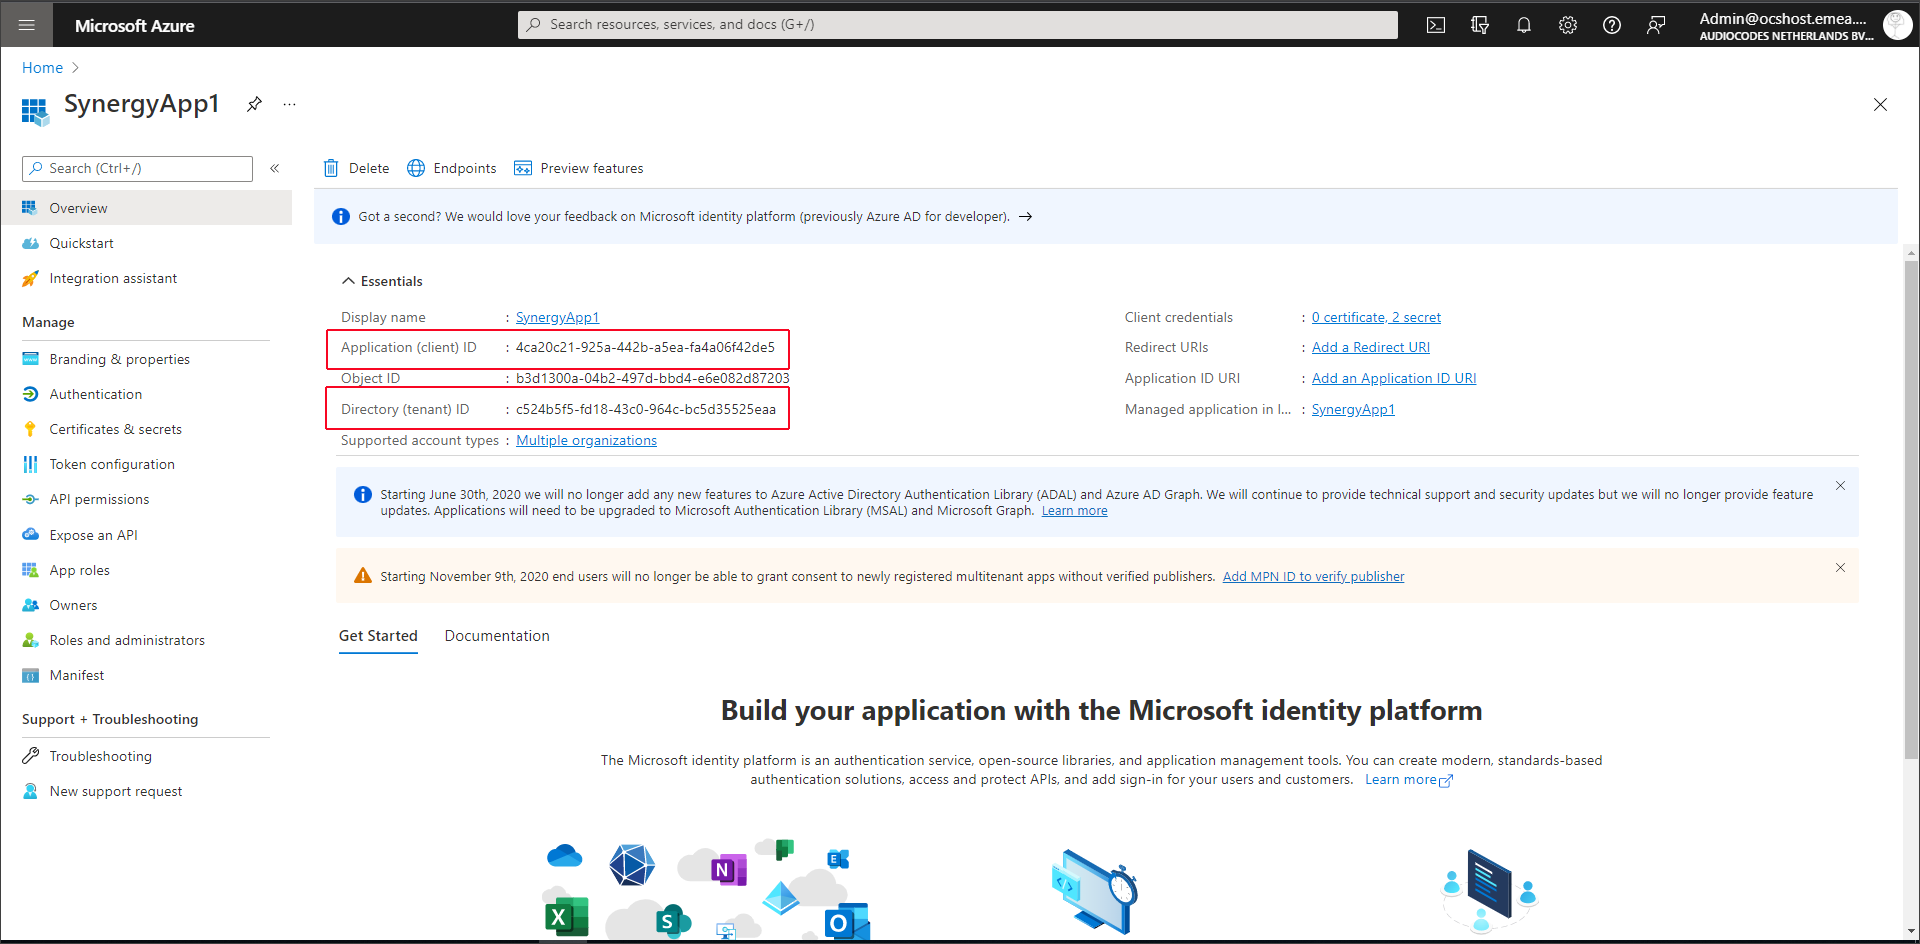
The Directory (tenant) ID for the Operator Connect Azure registration (see Deploying Microsoft Synergy Application).
If the Tenant ID field is left blank then the Tenant ID is retrieved from the General tab “Azure Tenant ID” field. |
|||||||||||||||
|
Application Registration (client) ID |
The Application Registration (client) ID for the Operator Connect Azure registration (see Deploying Microsoft Synergy Application). If the Tenant ID is left blank then the Tenant ID is retrieved from the General tab “Azure Tenant ID” field. |
|||||||||||||||
|
Change App Registration Client Secret |
Configure the client secret that was generated in Deploying Microsoft Synergy Application. |
|||||||||||||||
|
Landing Page URL |
Landing Page URL of the Service Provider. Default: Operator Connect. |
|||||||||||||||
|
Operator Contacts |
Click the Add button to add new contacts. | |||||||||||||||
|
Type |
From the Type drop-down, select one of the following:
|
|||||||||||||||
|
Title |
Title |
|||||||||||||||
|
Display Name |
Display name in Live Platform portal. |
|||||||||||||||
|
First Name |
First Name |
|||||||||||||||
|
Last Name |
Last Name |
|||||||||||||||
|
|
Work Email address |
|||||||||||||||
|
SIP Alias |
SIP alias |
|||||||||||||||
|
Phone Number |
Primary Work phone number. |
|||||||||||||||
|
Second Phone Number |
Second Work phone number. |
|||||||||||||||
|
Offers |
||||||||||||||||
|
Offer Type |
|
|||||||||||||||
|
Offer Markets |
|
|||||||||||||||
|
Markets |
List of countries for activating calling. |
|||||||||||||||
|
Offer Type |
|
|||||||||||||||
|
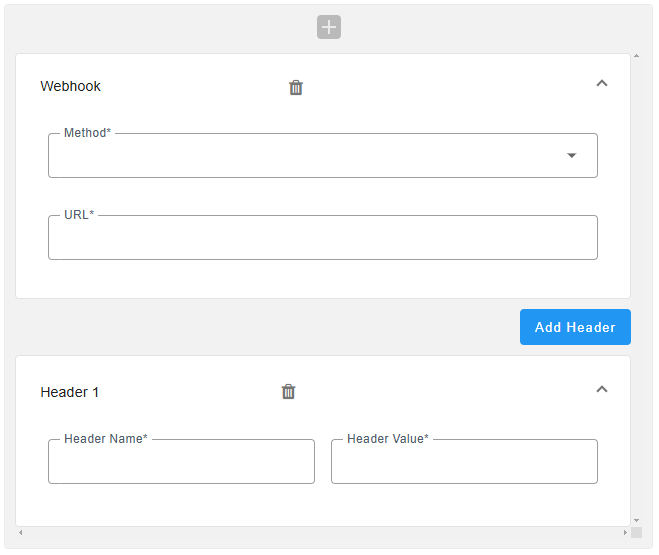
Web Hook |
Web Hook |
|||||||||||||||
|
Web Hook- Headers |
|
|||||||||||||||
|
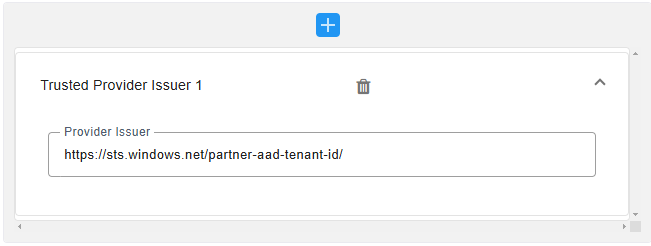
Trusted Provider Issuers |
||||||||||||||||
|
Trusted Provider Issuers |
Click the Add button to add a Trusted Provider Issuer.
|
|||||||||||||||
| 8. | Click the Contact Info tab. |
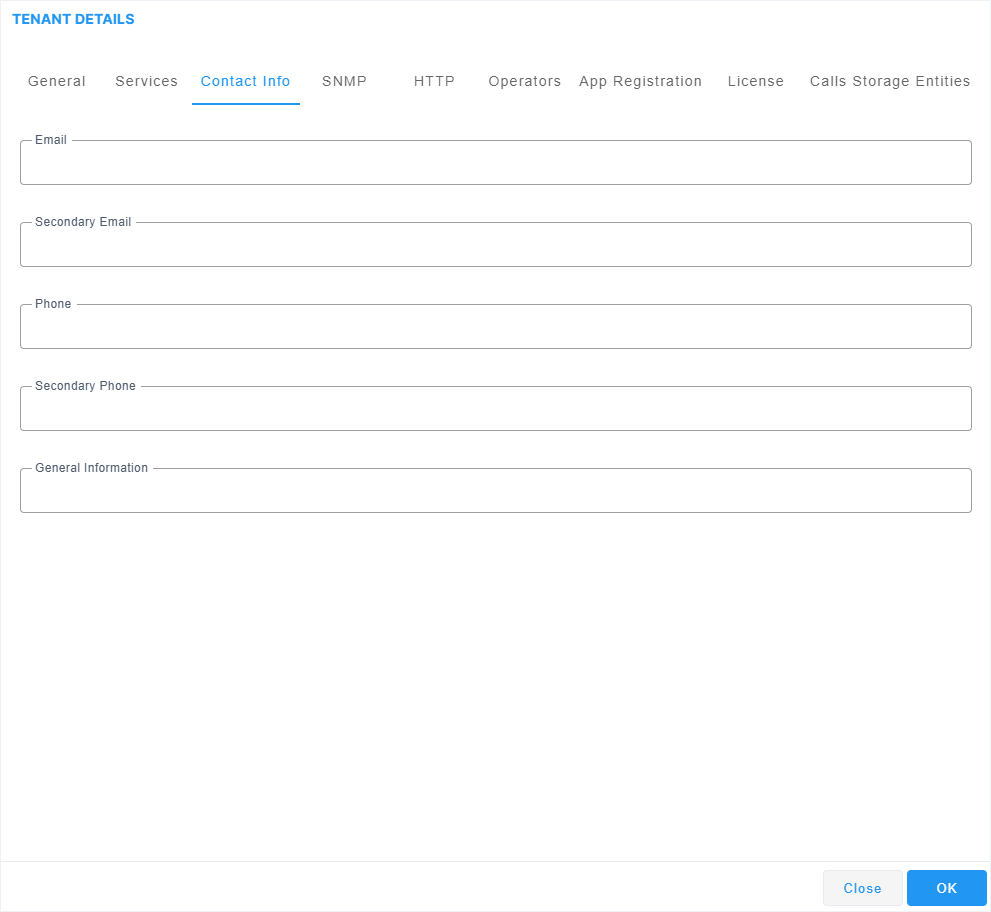
| 9. | Optionally enter the following Contact Details that can be used by AudioCodes for monitoring and alarms for customers who are managed directly by AudioCodes Professional Services: |
| ● | Email Address |
| ● | Phone Number |
| ● | Secondary Email Address |
| ● | Secondary Phone Number |
| ● | General Information |
| 10. | Click the SNMP tab. |

| 11. | Configure parameters according to the table below. |
Tenant Details – SNMP v2
|
Parameter |
Description |
|---|---|
|
SNMP Read Community |
Enter an encrypted SNMP read community string. The default value for the SNMP read community string is taken from the SNMP main template. |
|
SNMP Write Community |
Enter an encrypted SNMP write community string. The default value for the SNMP write community string is taken from the SNMP main template. |
|
Trap Community |
Enter the Trap Community string to be received as part of the Notification message. The default value for the SNMP trap community string is taken from the SNMP main template. |
| 12. | Click Edit SNMPv3 Settings. |
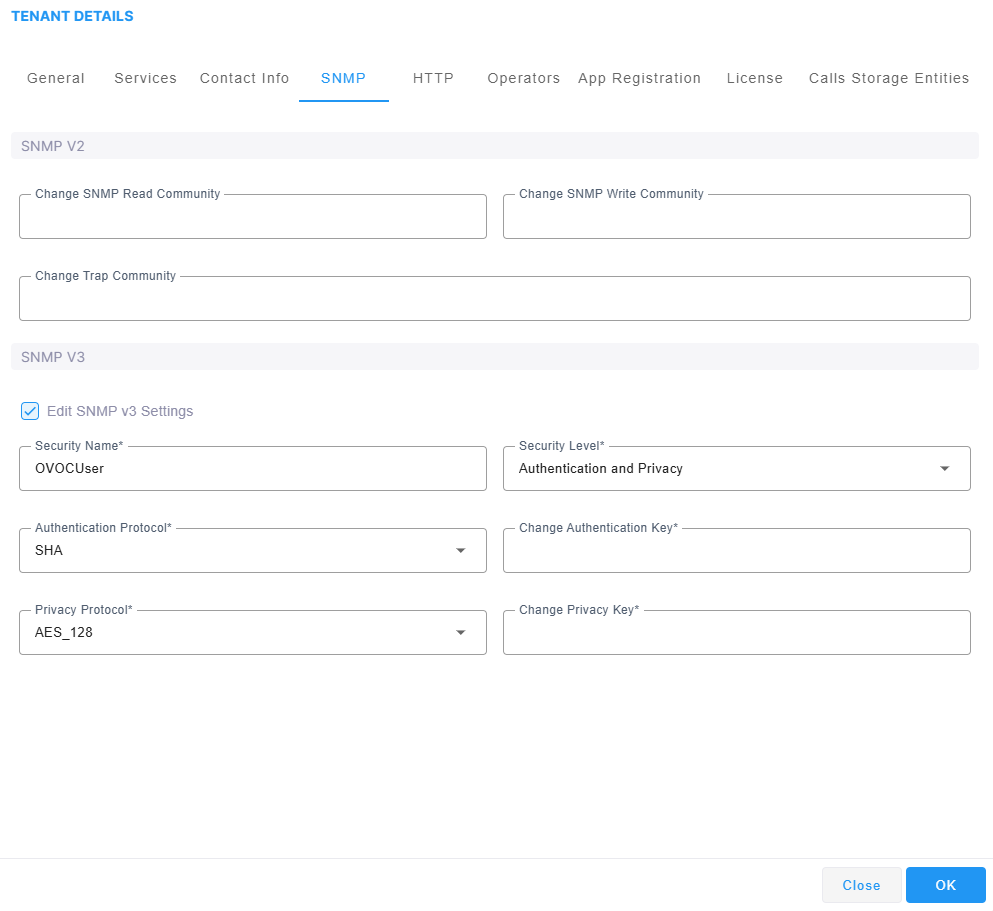
| 13. | Configure parameters according to the table below. |
Tenant Details – SNMP v3
|
Parameter |
Description |
|||||||||
|---|---|---|---|---|---|---|---|---|---|---|
|
Security Name |
Enter a name for SNMP v3. Example: OVOC User. |
|||||||||
|
Security Level |
From the drop-down, select one of the following:
|
|||||||||
|
Authentication Protocol |
From the drop-down, select either:
|
|||||||||
|
Authentication Key |
Enter an Authentication Key. The default is taken from main SNMP template. |
|||||||||
|
Privacy Protocol |
Select one of the following:
|
|||||||||
|
Privacy Key |
Enter a Privacy Key. The default is taken from main SNMP template. |
SNMPv2/SNMPv3 account credentials are not automatically configured so you need to manually configure identical settings in the device's Web interface (see the device's documentation for more information).
| 14. | Click the HTTP tab and then click Edit HTTP Settings. |
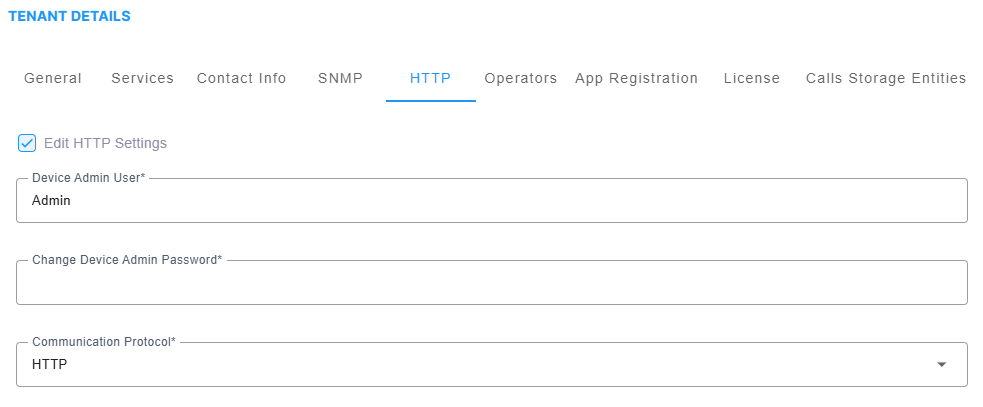
| 15. | Configure parameters according to the table below. |
Tenant Details - HTTP
|
Parameter |
Description |
||||||
|---|---|---|---|---|---|---|---|
|
Device Admin User |
Enter the device Web server user name. Example: Admin. Password - "Admin". The default is taken from the main HTTP template. |
||||||
|
Device Admin Password |
Enter the Web server password. Example: Admin. The default is taken from the main HTTP template. |
||||||
|
Communication Protocol |
From the drop-down, select either:
|
| 16. | Click the Operators tab. |
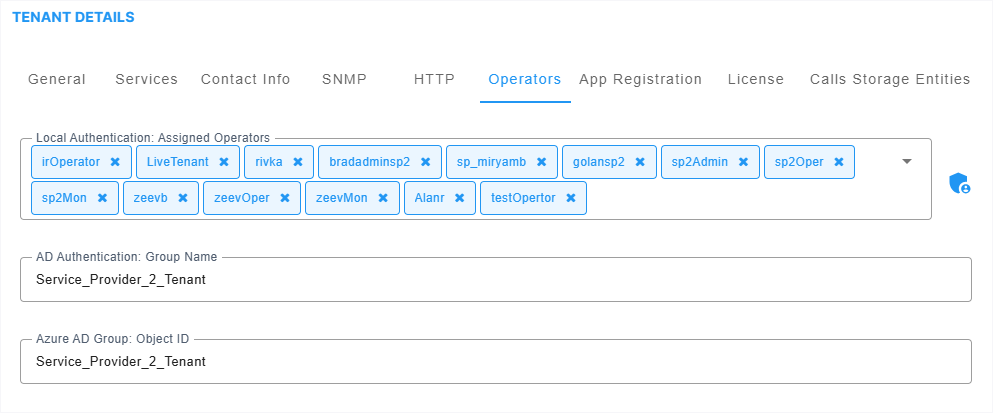
| 17. | Configure parameters according to the table below. |
Tenant Details- Operators
|
Parameter |
Description |
|---|---|
|
Local Authentication: Assigned Operators |
From the drop-down, select an operator from the list of operators. Only operators configured as 'tenant' type operators are displayed. The list will be empty if no such operator has been configured, in which case you can click the button described next, to add a 'tenant' type operator. The parameter lets you assign an operator – or operators – to the tenant. see Adding Local System Operators (Optional) for more information about configuring 'tenant' type operators. |
|
|
Operator authentication can be configured locally, in the OVOC (see "Configuring Operator Authentication Locally" in the OVOC User’s Manual). Click the button to add a new 'tenant' type operator; the 'Tenant Operator Details' screen opens. The operator is then assigned to the tenant and displayed in the drop-down list. |
|
AD Authentication: Group Name |
Applies to 'tenant' type operators. When an operator logs in to OVOC, OVOC (before allowing the operator access) checks with the enterprise's Azure Active Directory if the User Group which the operator is associated in OVOC is compatible with the User Group defined in Azure Active Directory . If they match, then when logged in, the operator is assigned to this tenant. Note: this parameter must be configured with the name of the Security Group that you added in Adding Main Tenant Operators and Assigning to Azure GroupsRegister OVOC Application in Main Tenant. |
| Azure AD Group: Object ID |
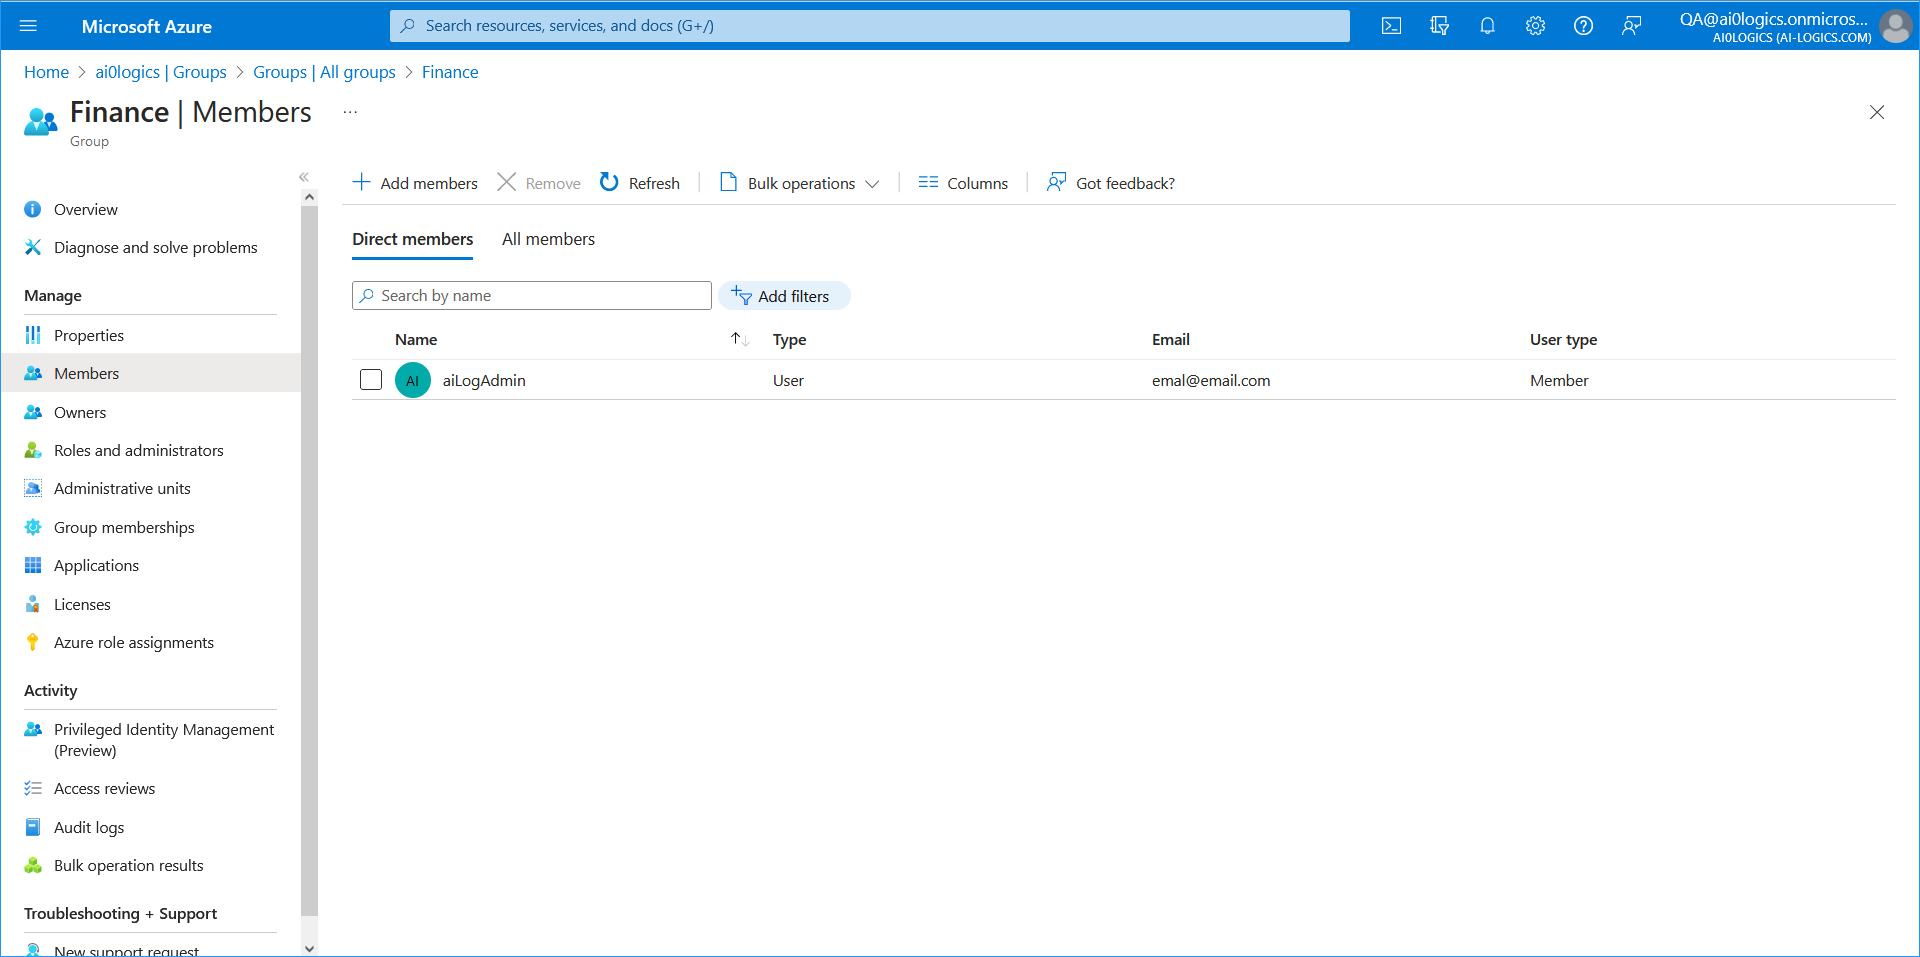
Service Provider operators can be assigned to a specific Azure AD Group whose members they are designated to manage. For example, in the Finance Group, the operator "aiLogAdmin" manages only employees in the Finance department. This operator can only view and manage the Finance group employees. The same logic applies for other managed groups for the same tenant. This feature enables affiliated corporations to be managed under the Active Directory tenant of their Parent corporate group. See Mapping Azure Groups to Customer Tenant
|

| 18. | Click the App Registration tab. |

| 19. | Enter the White Label FQDN: This feature enables Service Providers to request a CCM for white labeling including a Vanity URL and Login Page with a Corporate logo. |
| 20. | Enter the White Label Display Name: This name is displayed in the login screen Welcome message. For example "Welcome to LIVE PLATFORM-SP2" where the custom string is " LIVE PLATFORM-SP2". If this field is not defined, then the Service Provider tenant name as defined in the General tab (see above) is displayed in the login screen. |


| 21. | Select the Enable Custom App Registration check box. This feature configures a Landing page for onboarding new customers to join to a specific channel partner. |
| a. | Select either MS Entra Public or MS Entra Government check boxes and then configure the following parameters for the unique Service Provider registration: |
| ◆ | Security Azure Hostname: https://login.microsoftonline.com/ |
| ◆ | Azure AD Path Type File: |
-Tenant: Local License
-Organizations: Live Platform can access Azure AD in the enterprise network if a standard service is purchased.
| ◆ | Azure Tenant ID: Tenant ID of the White label reseller |
| ◆ | Azure Client ID: Application (Client) ID of the White label reseller |
| ◆ | Azure Client Secret; Client secret of the App registration of the White label reseller |
Example MS Entra Government Configuration
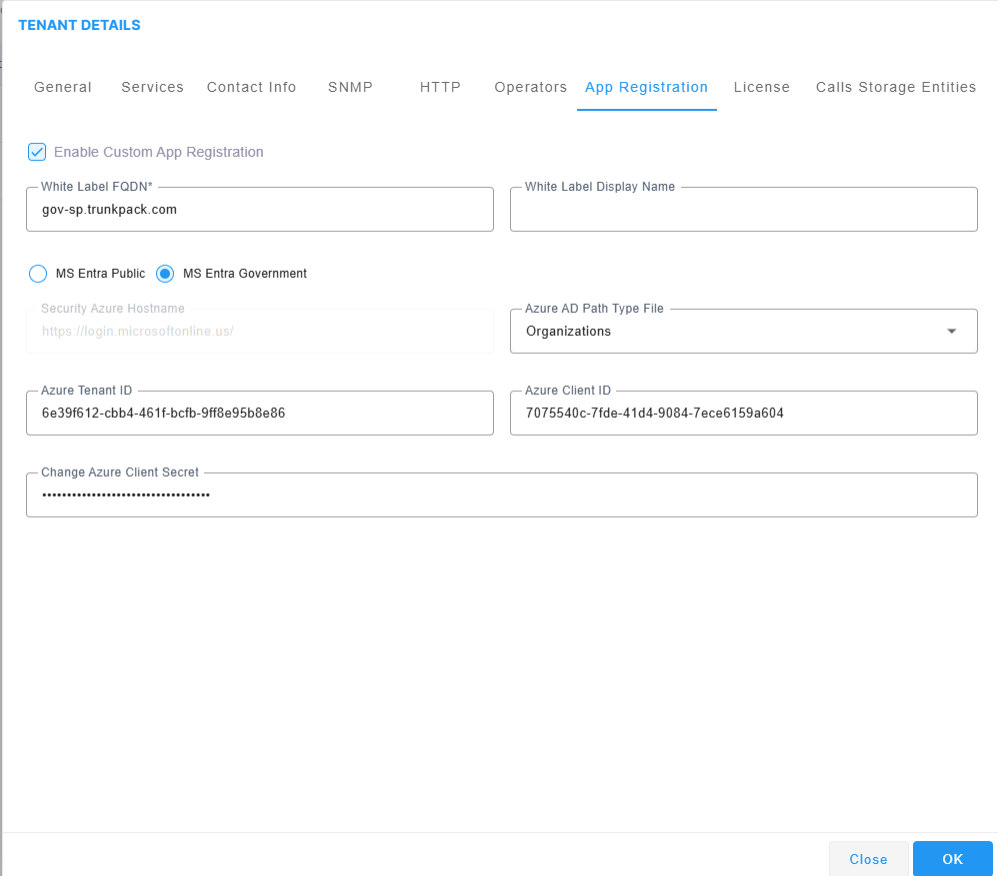
MS Entra Government includes unique parameters for United States government deployments. You must manually add a Registration for this setup and then extract the details of this registration to configure in the above tab (see Registering OVOC Application in Main Tenant).
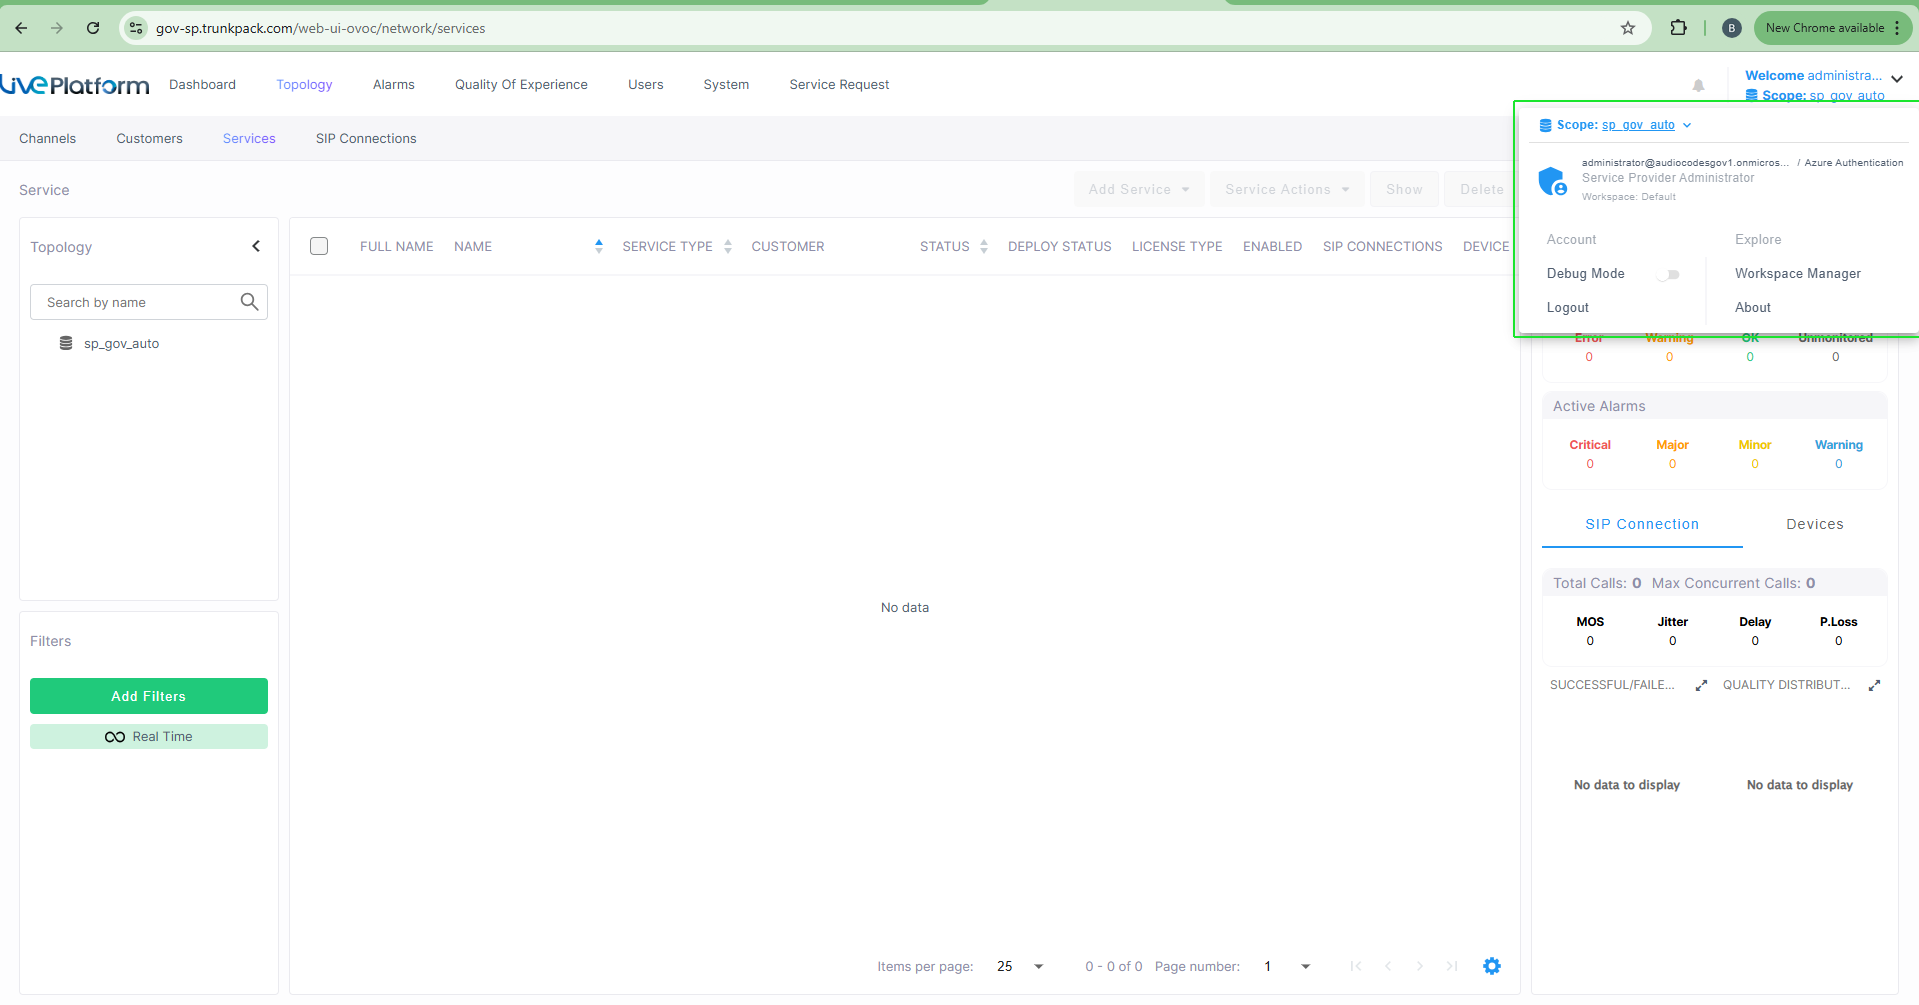
See example login in the screen below.
For detailed procedures, see White Labeling Service Providers .
| 22. | Click the License tab. |
| 23. | Configure parameters according to the table below. |
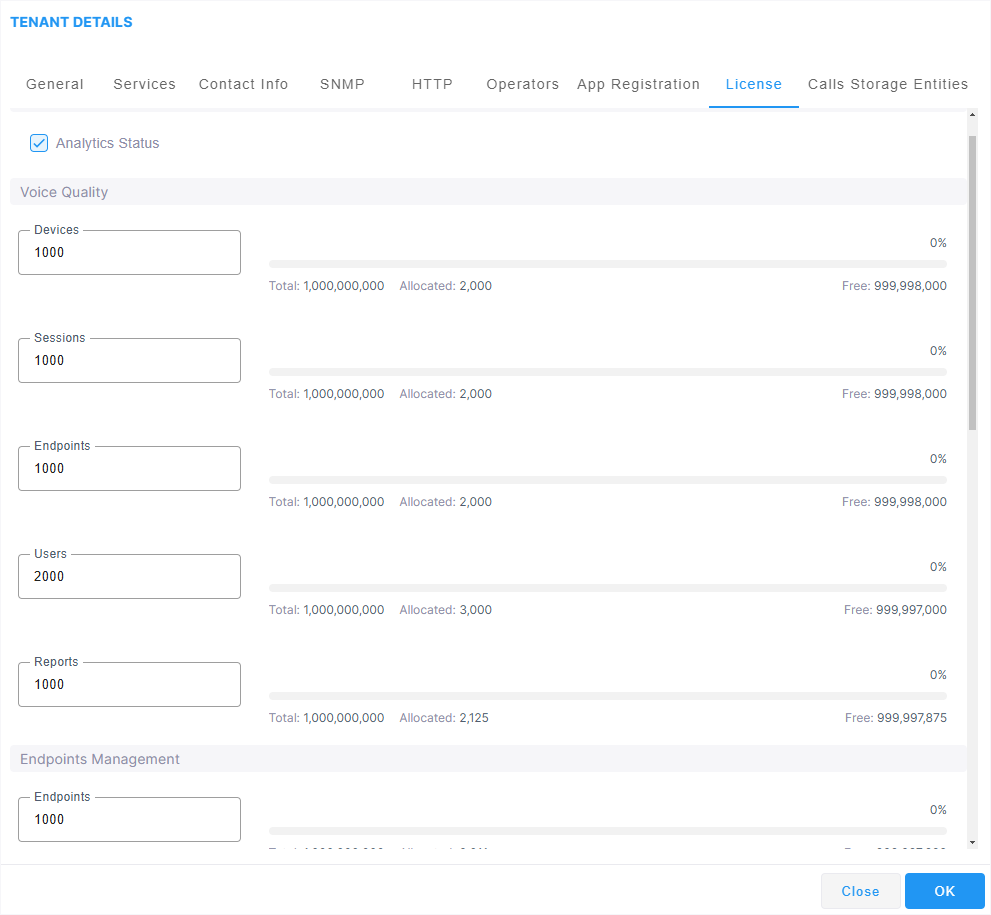
Tenant Details – License
|
License Pool |
Description |
|---|---|
|
Devices |
Enter the total number of devices that can be managed by this tenant's License Pool, i.e., User Management Pack 365 devices, SBC devices, gateway devices and MSBR devices allowed by your license. The parameter only defines systems. It does not include phones. |
|
SBC Registrations |
Enter the number of SIP endpoints that can register with the SBCs allowed by your license. |
|
SBC Sessions |
Enter the number of concurrent call sessions supported by the SBCs in your deployment. |
|
SBC Signaling |
Enter the number of SBC signaling sessions supported by the SBCs in your deployment. |
|
SBC Transcoding |
Enter the number of SBC transcoding sessions supported by the SBC devices in your deployment. |
|
CB Analog Devices |
Support pending. Currently unsupported. |
|
CB PBX Users |
Support pending. Currently unsupported. |
|
CB Users |
Enter the number of User Management Pack 365 users per tenant. Divide the total number of User Management Pack 365 users allowed by your license, by the number of tenants in your deployment. If you purchased a license for 1000 User Management Pack 365 users and you have four tenants in your deployment, 250 users can be allocated to each tenant. You cannot exceed the total number of User Management Pack 365 users covered by your license. It's your decision how to distribute them over tenants. |
|
CB Voicemail Accounts |
Support pending. Currently unsupported. |
|
Voice Quality |
|
|
Devices |
Enter the number of SBCs, gateways and MSBRs that can be mon- itored in this tenant. |
|
Endpoints |
Enter the number of endpoints that can be monitored in this tenant. |
|
Sessions |
Enter the number of concurrent call sessions the SBCs deployed in this tenant. |
|
Users |
Enter the number of users supported by the SBC/s deployed in this tenant. |
|
Reports |
Select the number of reports to allocate to the tenant. In the example here, a total of 5 can be allocated. If 6 are chosen, the indication bar turns red alerting you that the total has been exceeded. |
|
Endpoints Management |
|
|
Endpoints |
Enter the number of endpoints the Device Manager application supports for this tenant. |

| 24. | Click the Call Storage Entities tab. |

| 25. | Configure parameters according to the table below. |
These parameters do not have default values applied in the Call Storage template (see Customizing Calls Storage), therefore its mandatory to configure them.
| Parameter | Description |
|---|---|
|
Total Calls |
The maximum number of calls that can be stored on the Live Platform server. |
|
Calls with Call Flow |
The maximum number of calls together with Call Flow that can be stored on the Live Platform server. |
|
Devices Statistics |
The maximum number of Device statistic data entries that can be stored on the Live Platform server. |
|
SIP Connections Statistics |
The maximum number of SIP Connection statistic data entries that can be stored on the Live Platform server. |
|
Sites Statistics |
The maximum number of Sites statistic data entries that can be stored on the Live Platform server. |
|
Endpoints Statistics |
The maximum number of Endpoints statistic data entries that can be stored on the Live Platform server. |
|
Users Statistics |
The maximum number of Users statistic data entries that can be stored on the Live Platform server. |
|
URI Statistics |
The maximum number of URI statistic data entries that can be stored on the Live Platform server. |
|
Location Statistics |
The maximum number of Location statistic data entries that can be stored on the Live Platform server. |
|
Customer Statistics |
The maximum number of Customer statistic data entries that can be stored on the Live Platform server. |
|
Service Statistics |
The maximum number of Service statistic data entries that can be stored on the Live Platform server. |
| 26. | Click OKto add the Service Provider. |