Viewing and Managing Recap of Meeting Recording
You can view the recap added during and after the meeting recording in Meeting Insights mobile app. You can also add, edit, or delete a recap. In addition, you can trigger AI to generate Questions & Answers, Issues & Solutions, Outline, and a transcription.
|
➢
|
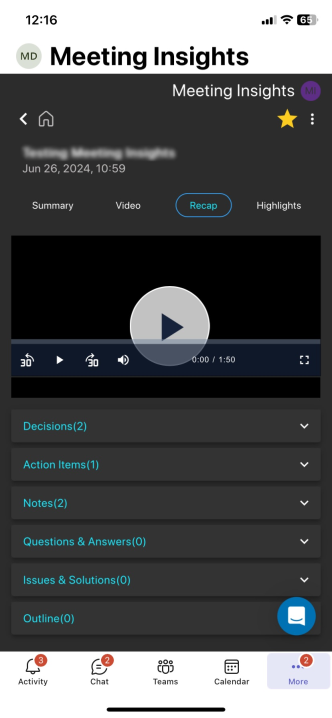
To view and manage meeting recap: |
|
2.
|
Tap the meeting recording that you want; the Player screen opens. |
|
3.
|
Tap Recap; the different recap types are displayed below the video player (if exists). Each recap tab name displays the number of added items. |
|
●
|
To view decisions, tap the Decisions tab. |
|
ii.
|
In the text box, type your decision, and then tap Add Decision. |
|
●
|
To edit a decision, tap the ellipsis icon (three vertical dots), and then from the drop-down menu, choose icon (three vertical dots), and then from the drop-down menu, choose  Edit, make your changes, and then tap Update. Edit, make your changes, and then tap Update. |
|
●
|
To delete a decision, tap the ellipsis icon (three vertical dots), and then from the drop-down menu, choose Delete, and then in the confirmation box, tap Delete. Delete, and then in the confirmation box, tap Delete. |
Only the Owner of the meeting recording can add, edit, or delete decisions.
|
●
|
To view action items, tap the Action Items tab. |
|
ii.
|
In the text box, type what needs to be done. |
|
iii.
|
Assign the action item to a person, by tapping Assign to, and then from the pop-up list, selecting the person's name. |
|
iv.
|
Define a date by which the action item should be done, by tapping Due date, and then using the pop-up calendar to select the date. |
|
●
|
To send an action item to an external, integrated platform: |
|
◆
|
Microsoft Planner: Tap the ellipsis icon, and then from the drop-down menu, choose  Send to Planner. Send to Planner. |
|
◆
|
monday.com: Tap the ellipsis icon, and then from the drop-down menu, choose  Send to monday. Send to monday. |
|
◆
|
Zoho: Tap the ellipsis icon, and then from the drop-down menu, choose  Send to Zoho. Send to Zoho. |
|
●
|
To edit an action item, tap the ellipsis icon, and then from the drop-down menu, choose Edit, make your changes, and then tap Update. |
|
●
|
To delete an action item, tap the ellipsis icon, and then from the drop-down menu, choose Delete, and then tap Delete in the confirmation message box. |
|
●
|
To view notes, tap the Notes tab. |
|
ii.
|
In the text box, type your note. |
|
iii.
|
Toggle the Private / Public button to make the note visible only to you or to everyone, respectively. |
|
●
|
To edit a note, tap the ellipsis icon, and then from the drop-down menu, choose Edit, make your changes, and then click Update. |
|
●
|
To delete a note, tap the ellipsis icon, and then from the drop-down menu, choose Delete, and then tap Delete in the confirmation message box. |
|
7.
|
Questions & Answers, Issues & Solutions, and Outline:
|
|
●
|
To view the recap, tap the Questions & Answers, Issues & Solutions, or Outline tab. |
|
●
|
To generate an AI-powered Questions & Answers, Issues & Solutions, and Outline: |
|
i.
|
Tap the Questions & Answers, Issues & Solutions, or Outline tab. |
|
ii.
|
In the Run AI to Generate box, from the 'Type or select meeting language' drop-down list, select the language. |

|
●
|
The AI also generates a transcription of the meeting recording. |
|
●
|
During the AI process, you can stop the generation by tapping Stop. |
|
●
|
To play the video from a specific AI-generated recap, tap the specific recap. |
|
●
|
To copy the AI-generated recap, tap  located next to the respective Questions & Answers, Issues & Solutions, or Outline tab. located next to the respective Questions & Answers, Issues & Solutions, or Outline tab. |
|
●
|
To email the AI-generated recap to yourself, tap  located next to the respective Questions & Answers, Issues & Solutions, or Outline tab, and then click Send. located next to the respective Questions & Answers, Issues & Solutions, or Outline tab, and then click Send. |