Configuring DHCP Server on LAN
The LAN Interface page lets you configure the LAN interface as a DHCP server, providing IP address assignment to workstations connected to the LAN interface.
|
➢
|
To configure DHCP server on LAN: |
|
1.
|
Open the LAN Interface page (Setup menu > IP Network tab > Core Entities folder > LAN Interface). |
|
2.
|
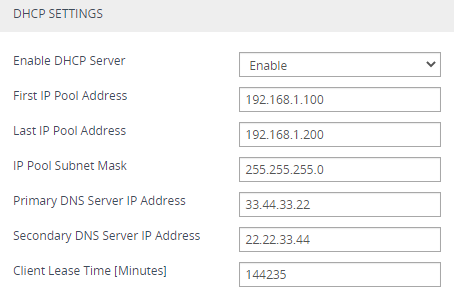
Under the DHCP Settings group, from the 'Enable DHCP Server' drop-down list, select Enable; the following fields appear: |
|
a.
|
In the 'First IP Pool Address' and 'Last IP Pool Address' fields, enter the first and last IP address to create a pool of assignable addresses. |
|
b.
|
In the 'IP Pool Subnet Mask' field, enter the subnet mask of the DHCP pool of assignable addresses. |
|
c.
|
In the 'Primary DNS Server IP Address' and 'Secondary DNS Server IP Address' fields, enter the primary and optionally, secondary DNS server addresses. The DHCP server can use this DNS to translate domains into IP addresses on behalf of the workstations. |
|
d.
|
In the 'Client Lease Time' field, enter the amount of time in minutes that a workstation can use its allocated IP address. After this time, the device allocates a new IP address. |
The LAN Interface page is available only if you have configured the device to display various data-router configuration pages in the Web interface. For more information, see the [WebDataConfig] parameter.