Rescue Options using System Snapshots
The device features a System Snapshots mechanism that allows you to return the device (system) to a previous software version and configuration. The mechanism may be used, for example, as a rescue option if a system malfunction occurs.
Creating a System Snapshot captures a complete state of the device, including:
| ■ | Installed software |
| ■ | Current configuration |
| ■ | Auxiliary files |
| ■ | License Key |
The device automatically creates the first System Snapshot upon initial installation. This System Snapshot is assigned the name "Fix-current-installation" and is initially set as default. The device automatically updates this System Snapshot each time you make configuration changes to your device. You cannot edit its name or delete it. If you create additional System Snapshots, you can set a different System Snapshot as the default. The benefit of the "Fix-current-installation" System Snapshot is that it's always up-to-date and if you do have problems with your configuration, you can always roll back your configuration based on this System Snapshot.
In addition to the "Fix-current-installation" System Snapshot, you can create another four System Snapshots (i.e., the device supports a maximum of five System Snapshots). If you have five System Snapshots and you create another System Snapshot, the new System Snapshot replaces the oldest one (i.e., first-in, first-out or FIFO).
The default System Snapshot is used as a restore point for automatic recovery of the device in case of severe software malfunction that prevents the device from successfully restarting (booting) for a user-defined consecutive number of restart attempts (configured by the [MaxStartupFailAttempts] parameter). Automatic recovery returns the device to the default System Snapshot and may take up to 10 minutes or more to complete. The last user-created System Snapshot is automatically set as default, although you can select a different System Snapshot as the default.
| ● | You can also use GRUB for System Snapshots. For more information, see Manual Recovery through GRUB. |
| ● | If the device operates in HA mode and you create a System Snapshot on the active device, the redundant device also creates a System Snapshot of itself with the same name. If you later modify the name of a System Snapshot or delete a System Snapshot, the same operation is done for the corresponding System Snapshot (same name) on the redundant device. However, if the new name is not unique on the active and redundant devices, the renaming operation fails. |
| ● | If you try creating a System Snapshot and there is insufficient memory on the device to store it, the System Snapshot is not created (and the device sends a syslog message to indicate this failure). |
| ● | Loading a System Snapshot is not supported in HA mode. |
| ● | It's recommended to use the device's System Snapshot feature (as described in this section) and not the snapshot mechanism of the hypervisor. However, If you prefer to use the hypervisor's snapshot mechanism for backup purposes, then: |
| ✔ | Take a snapshot only of the redundant virtual machine. If you need to take a snapshot of the active virtual machine, perform a High-Availability (HA) switchover and then take a snapshot of the redundant virtual machine (formerly active). |
| ✔ | Take a snapshot only of the file system, without the memory. Taking a snapshot of the memory increases the duration of the snapshot and doesn't provide any advantage to the SBC application. |
| ● | For CE, system snapshots are applicable only to the Signaling Components (SC). |
The following procedure describes how to configure System Snapshots through the Web interface. You can also configure it through CLI (system-snapshot).
| ➢ | To create a System Snapshot: |
| 1. | Open the System Snapshots page (Setupmenu > Administration tab > Maintenance folder > System Snapshots). |
| 2. | Click Create system snapshot; the following dialog box appears: |
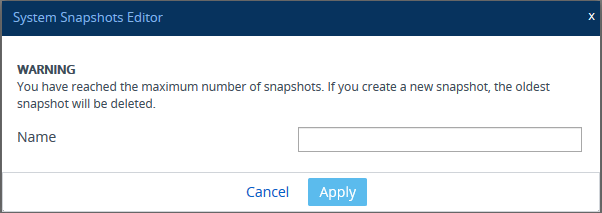
| 3. | In the 'Name' field, enter a name for the System Snapshot. |
The 'Name' field is mandatory. The value can contain up to 64 characters and must be unique. The value must only contain alphanumeric characters and cannot be named "force", "red-", "act-", "all", or "no-name" .
| 4. | Click Apply; the newly created System Snapshot is added to the table (listed first) and becomes the default System Snapshot (displayed as "*Default"). The table shows the date and time when you created the System Snapshot as well as the device's software version when it was created. |
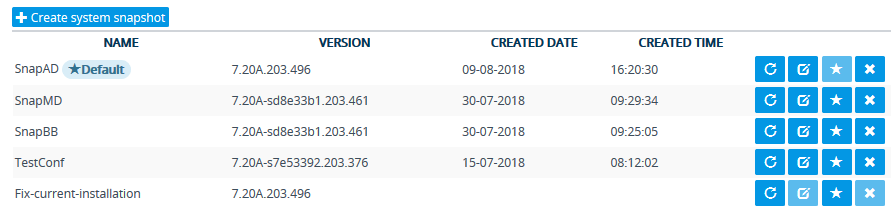
Once you have created System Snapshots, you can do various actions on a System Snapshot by clicking its corresponding icons in the table:
Actions on System Snapshots using the Table Icons
|
Icon |
Name |
Description |
|---|---|---|
|
|
Load |
Loads the System Snapshot and returns the device to the software version and configuration that is based on the selected System Snapshot. Note: This action involves a device restart. |
|
|
Edit |
Modifies the name of the System Snapshot. Note: You cannot edit the"Fix-current-installation" System Snapshot. |
|
|
Set as Default |
Makes the System Snapshot default. If the device malfunctions, the device automatically returns to this default System Snapshot. Note: When you create a System Snapshot, it is automatically set as default. |
|
|
Delete |
Deletes the System Snapshot. Note: You cannot delete the "Fix-current-installation" System Snapshot. |