Assigning CSR-based Certificates to TLS Contexts
You can request a digitally signed certificate from a Certification Authority (CA) for a TLS Context. This process is referred to as a certificate signing request (CSR) and is required if your organization employs a Public Key Infrastructure (PKI) system. The CSR contains information identifying the device such as a Distinguished Name (DN) or subject alternative names in the case of an X.509 certificate.
|
➢
|
To assign a CSR-based certificate to a TLS Context: |
|
2.
|
Select the required TLS Context, and then click the Change Certificate link located below the table; the Change Certificates page appears. |
|
3.
|
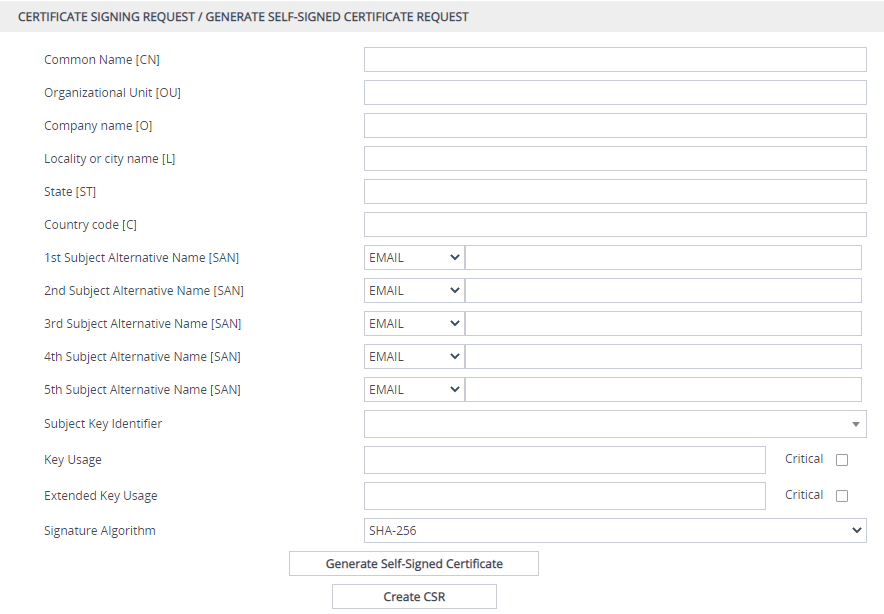
Under the Certificate Signing Request/ Generate Self-Signed Certificate Request group, fill in the following fields according to your security provider's instructions: |
|
a.
|
Distinguished Name (DN) fields (uniquely identifies the device): |
|
❖
|
In the 'Common Name [CN]' field, enter the common name. If you leave this field empty, the device generates the CSR with the default CN "CN=ACL_<device's 6-digit serial number>". |
|
❖
|
In the 'Organizational Unit [OU]' field, enter the section of the organization. |
|
❖
|
In the 'Company name [O]' field, enter the legal name of your organization. |
|
❖
|
In the 'Locality or city name [L]' field, enter the city where your organization is located. |
|
❖
|
In the '
State [ST]' field, enter the state or province where your organization is located. |
|
❖
|
In the 'Country code [C]' field, enter the two-letter ISO abbreviation for your country. |
|
a.
|
If you want to generate a CSR for SAN (with multiple subject alternate names), then from the 'Subject Alternative Name [SAN]' drop-down list, select the type of SAN (e-mail address, DNS hostname, URI, or IP address), and then enter the relevant value. You can configure multiple SAN names, using the 1st to 5th 'Subject Alternative Name [SAN]' fields. |
|
b.
|
From the 'Subject Key Identifier' drop-down list, configure the subject key identifier (SKI) X.509 field: |
|
❖
|
User-defined hex value (max. 128 characters), without "0x, for example, "00D06F00D4D06746" |
|
❖
|
hash-SHA1 (sets SKI to 160 bits of SHA-1 digest on public key) |
|
❖
|
hash-SHA1-60lsb (sets SKI to 0100 followed by least significant 60 bits of SHA-1 digest on public key) |
|
a.
|
From the 'Key Usage' drop-down list, select the key usage X.509 field values: |
|
❖
|
Digital Signature (Certificate can be used to apply a digital signature) |
|
❖
|
Non Repudiation (Certificate can be used to sign data as above, but the certificate's public key may be used to provide non-repudiation services, preventing the signing entity from falsely denying some action) |
|
❖
|
Key Encipherment (Certificate may be used by the subject to encrypt a symmetric key which is then transferred to the target, decrypted, and subsequently used to encrypt and decrypt data sent between the two entities) |
|
❖
|
Data Encipherment (Certificate can be used by the subject to encrypt and decrypt actual application data) |
|
❖
|
Key Agreement (Certificate's subject can use a key agreement protocol such as Diffie-Hellman to establish a symmetric key with a target that may then be used to encrypt and decrypt data sent between the two entities) |
|
❖
|
Key Certificate Sign (Certificate's subject can use public key for verifying Digital Signature on Public Key certificates) |
|
❖
|
Certificate Revocation List Sign (Certificate's subject can use public key for verifying signatures on Certificate Revocation List lists, e.g., CRLs) |
|
❖
|
Encipher Only (Certificate's subject can use public key only for enciphering data while performing Key agreement) |
|
❖
|
Decipher Only (Certificate's subject can use public key only for deciphering data while performing Key agreement) |
You can define the key as critical (mandatory), by selecting the 'Critical' check box.
|
a.
|
From the 'Extended Key Usage' drop-down list, select the extended key usage X.509 field values: |
You can define the key as critical (mandatory), by selecting the 'Critical' check box.
|
a.
|
From the 'Signature Algorithm' drop-down list, select the hash function algorithm (SHA-256 or SHA-512) with which to sign the certificate. |
|
4.
|
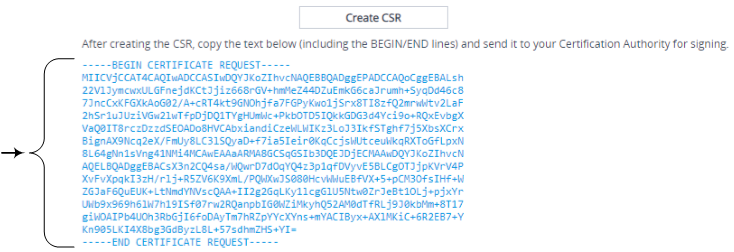
Click the Create CSR button; a textual certificate signing request is displayed below the button: |
|
5.
|
Copy the text and then send it to your security provider (CA) to sign this request. |
Make sure that your copied text includes the "BEGIN CERTIFICATE REQUEST" and "END CERTIFICATE REQUEST" lines.
|
6.
|
When the CA sends you a server certificate, save the certificate to a file (e.g., cert.txt). Make sure that the file is a plain-text file containing the "BEGIN CERTIFICATE" header. |
|
7.
|
Scroll down to the Upload Certificates Files From Your Computer group, and then select and upload the cert.txt file, by clicking Load Device Certificate File: |

|
8.
|
Wait for the certificate to successfully upload to the device. |
|
10.
|
Verify that the private key is correct: |
|
a.
|
Open the TLS Contexts table, and then select the TLS Context. |
|
b.
|
Click the Certificate Information link located below the table. |
|
c.
|
Make sure that the 'Status' field displays "OK"; otherwise, consult with your security administrator: |

|
●
|
The certificate replacement process can be repeated whenever necessary (e.g., when the new certificate expires). |
|
●
|
You can also upload the certificate through the device's Automatic Provisioning mechanism, using the [HTTPSCertFileName] parameter. |