Record Audio and Shared Content Locally
You can use Meeting Insights built-in recorder to create a local recording on your computer to capture audio and shared content, such as screen shares and presentations. You can use this to record yourself speaking, other people detected by your computer's microphone, or participants of an online meeting.
|
●
|
Local recording is an optional feature. If it is not available, contact your administrator. |
|
●
|
The Meeting Insights app for Microsoft Teams doesn't support content sharing. Local recordings in the Teams app capture audio only from the selected audio device. |
|
●
|
During a local recording, you can't add meeting recaps. |
|
●
|
You can record locally using the Meeting Insights web interface or the Meeting Insights app for Microsoft Teams. |
|
➢
|
To start a local recording: |
|
1.
|
In the Navigation pane, click the microphone  icon; your browser displays a media permission prompt. |
|
2.
|
In the prompt, do the following: |
|
a.
|
Select the audio device on your computer that you want to use for audio recording. |
|
b.
|
Grant Meeting Insights access to the microphone. For security, AudioCodes recommends you grant temporary access only (e.g., in Google Chrome, choose the Allow this time option). |
|
3.
|
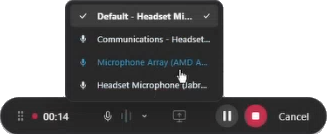
Meeting Insights displays a message box providing useful information for local recording. Read the information, and then click Got It; a floating playback control bar appears: |

|
4.
|
To reposition the control bar: |
|
●
|
On the control bar, click and hold the drag  handle. |
|
●
|
Drag the control bar to where you want it on the screen. |
|
5.
|
To change the audio device used for audio recording:
|
|
a.
|
On the control bar, click the Select microphone arrow; a pop-up list appears, listing all detected microphones on your computer. |
|
b.
|
Select the microphone you want. |
|
6.
|
To record shared content on your computer:
|
|
a.
|
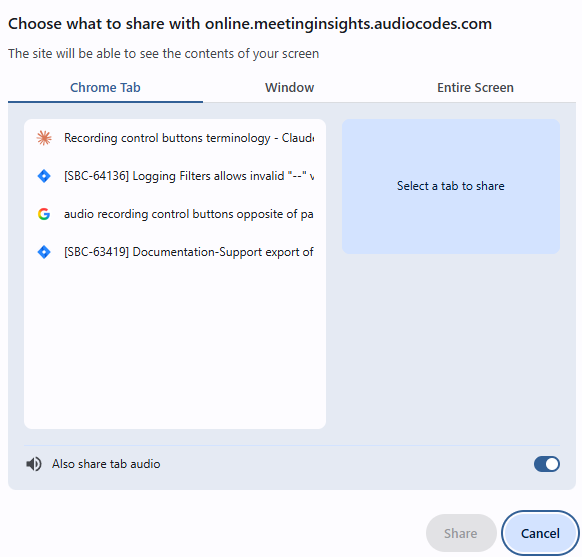
On the control bar, click the share content  icon; the following dialog box appears: |
|
b.
|
Choose what you want to share visually with your recording: |
|
❖
|
Browser (e.g., Chrome) Tab: Records only a specific tab in your web browser. If you switch to a different tab or another app, the recording remains locked to that specific web page. |
|
❖
|
Window: Shares only a single selected application (e.g., PowerPoint). |
|
❖
|
Entire Screen: Captures your complete desktop, including all visible windows, desktop icons, the taskbar, and notifications. This is ideal if you need to switch between apps or files during your recording. |
|
a.
|
If you also want to capture audio in the selected visual option (above), click the Also share tab audio toggle button to turn it on. |
When shared content is a specific browser tab or window, only the audio generated inside the specific tab or window is captured. When shared content is the entire screen, all system audio is captured, including every sound your computer makes, such as voice from participants in a current meeting, system alerts, background music, and audio from all open apps.
|
b.
|
Click Share; Meeting Insights starts recording the shared content. |
|
c.
|
To stop sharing content, use the browser’s sharing notification and click Stop sharing. |
|
7.
|
To mute and unmute the microphone (i.e., audio recording): |
|
●
|
Mute microphone: On the control bar, click the microphone  icon. |
|
●
|
Unmute microphone: On the control bar, click the microphone  icon again. |
|
8.
|
To pause and resume recording: |
|
●
|
Pause recording: On the control bar, click the pause recording  icon. |
|
●
|
Resume recording: On the control bar, click the resume recording  icon. |
|
9.
|
To finish your recording: |
|
a.
|
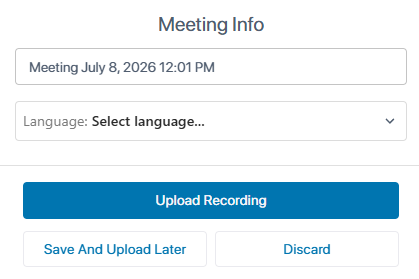
On the control bar, click the stop  icon; the following dialog box appears: |
|
b.
|
(Optional) Edit the name of the recording. By default, Meeting Insights automatically assigns a name to local recordings in the format "Meeting <date> <time>" (e.g., Meeting July 8, 2026 12:01 PM). |
|
c.
|
From the 'Language' drop-down list, select the language of the recorded audio. |
Select the correct language of the recorded audio so that Meeting Insights can generate an accurate transcription and insights.
|
d.
|
Choose one of the following options to upload the local meeting recording now or later, or to discard it: |
|
❖
|
Upload Recording: Meeting Insights uploads the recording from your computer, processes it like any other meeting recording, and adds it to the List View. |
|
❖
|
Discard: Meeting Insights deletes the recording. When prompted, click Discard to confirm deletion. |